AsciiDoc Syntax
This page describes the main syntax conventions when writing Asciidoctor/AsciiDoc.
For more info, see:
Headings
The number of preceding = signs indicates the heading level.
| Syntax | Meaning |
|---|---|
= Level 1 |
There can only be one level 1 per .adoc (at the very top). The paragraph immediately following the heading is the "preamble", and is rendered in a larger font. It’s therefore a good place to summarize the content of the document. |
== Level 2 |
Level 2 |
=== Level 3 |
Level 3 |
==== Level 4 |
Level 4 |
Paragraphs
| Syntax | Example |
|---|---|
Paragraphs are separated by one or more blank lines. So, this is a separate paragraph. |
Paragraphs are separated by one or more blank lines. So, this is a separate paragraph. |
All consecutive sentences are rendered in the same paragraph. This is another sentence in the para. And another one. Yet another. |
Sentences without a blank line are in the same paragraph. Don’t worry about word wrapping, just start the next sentence on the next line. |
In general, there’s no need to indent paragraphs; keep things left-aligned. Let the markup specify the logical indentation.
Bulleted lists
| Syntax | Example |
|---|---|
The blank line after this para is required: * Bullet 1 + + Indented paragraph (note the '+' to to chain this para with the bullet) * Bullet 2 ** Child bullets + + More indenting ** Another child bullet * Bullet 3 |
The blank line after this para is required:
|
Numbered lists
There’s no need to keep track of numbers, just use '1' or 'a' etc:
| Syntax | Example |
|---|---|
The blank line after this para is required: 1. Bullet 1 + + Indented paragraph 2. Bullet 2 a. Child bullets + + More indenting b. Another child bullet 3. Bullet 3 |
The blank line after this para is required:
|
While it isn’t necessary to maintain the ordering manually (could just use '1' for all bullets), this does generate warnings when the document is built.
Links and Cross-references
| Syntax | Example | Purpose |
|---|---|---|
link:http://ciserver:8080[CI Server] |
Link to an external hyperlink |
|
link:http://ciserver:8080[CI Server^] |
Link to an external hyperlink, with |
|
xref:conguide:ROOT:about.adoc#contributors-guide[background] |
Cross-reference to section in Antora document |
Tables
.Some table
[cols="3a,2a", options="header"]
|===

| Header col 1
| Header col 2

| Row 1 col 1
| Row 1 col 2

| Row 2 col 1
| Row 2 col 2

|===
renders as:
| Header col 1 | Header col 2 |
|---|---|
Row 1 col 1 |
Row 1 col 2 |
Row 2 col 1 |
Row 2 col 2 |
where:
-
the
colsattribute says how many columns there are and their respective widths. -
the "a" suffix indicates that the contents is parsed as AsciiDoc
Column Attributes
Other options are (credit):
-
e: emphasized
-
a: AsciiDoc markup
-
m: monospace
-
h: header style, all column values are styled as header
-
s: strong
-
l: literal, text is shown in monospace font and line breaks are kept
-
d: default
-
v: verse, keeps line breaks
For example:
.Table with column style e,a,m
[cols="e,a,m"]
|===
| Emphasized (e) | AsciiDoc (a) | Monospaced (m)

| Asciidoctor
| NOTE: *Awesome* way to write documentation
| It is just code

|===
renders as
| Emphasized (e) | AsciiDoc (a) | Monospaced (m) | ||
|---|---|---|---|---|
Asciidoctor |
|
|
and:
.Table with column style h,s,l
[cols="h,s,l"]
|===
| Header (h) | Strong (s) | Literal (l)

| Asciidoctor
| Awesome way to write documentation
| It is
just code

|===
renders as
| Header (h) | Strong (s) | Literal (l) |
|---|---|---|
Asciidoctor |
Awesome way to write documentation |
It is just code |
and:
.Table with column style d,v
[cols="d,v"]
|===
| Default (d) | Verse (v)

| Asciidoctor
| Awesome way
to write
documentation

|===
renders as
| Default (d) | Verse (v) |
|---|---|
Asciidoctor |
Awesome way to write documentation |
Column Alignment
This can be combined with alignment markers (credit):
-
<: top align values (default)
-
>: bottom align values
-
^: center values
For example:
[cols="^.>,<.<,>.^", options="header"]
|===

| Name
| Description
| Version

| Asciidoctor
| Awesome way to write documentation
| 1.5.0
|===
renders as:
| Name | Description | Version |
|---|---|---|
Asciidoctor |
Awesome way to write documentation |
1.5.0 |
where:
-
the first column is centered and bottom aligned,
-
the second column is left and top aligned and
-
the third column is right aligned and centered vertically.
Column/Row Spanning
We can also have columns or rows spanning multiple cells (credit):
For example:
.Cell spans columns
|===
| Name | Description

| Asciidoctor
| Awesome way to write documentation

2+| The statements above say it all

|===
renders as:
| Name | Description |
|---|---|
Asciidoctor |
Awesome way to write documentation |
The statements above say it all |
|
The N+ sign notation tells Asciidoctor to span this cell over N columns.
while:
.Cell spans rows
|===
| Name | Description

.2+| Asciidoctor
| Awesome way to write documentation

| Works on the JVM

|===
renders as:
| Name | Description |
|---|---|
Asciidoctor |
Awesome way to write documentation |
Works on the JVM |
The .N+ notation tells Asciidoctor to span this cell over N rows.
and:
.Cell spans both rows and columns
|===

| Row 1, Col 1 | Row 1, Col 2 | Row 1, Col 3

2.2+| Cell spans 2 cols, 2 rows
| Row 2, Col 3
| Row 3, Col 3

|===
renders as:
Row 1, Col 1 |
Row 1, Col 2 |
Row 1, Col 3 |
Cell spans 2 cols, 2 rows |
Row 2, Col 3 |
|
Row 3, Col 3 |
||
The N.M+ notation tells Asciidoctor to span this cell over N columns and M rows.
Admonitions
Callout or highlight content of particular note.
| Syntax | Example | ||
|---|---|---|---|
NOTE: the entire note must be a single sentence. |
|
||
[NOTE] ==== the note is multiple paragraphs, and can have all the usual styling, * eg bullet points: * etc etc ==== |
|
||
[TIP] ==== Here's something worth knowing... ==== |
|
||
[WARNING] ==== Be careful... ==== |
|
||
[IMPORTANT] ==== Don't forget... ==== |
|
Source code
Use [source] macro to specify source content:
[source,powershell]
----
get-command -module BomiArtifact
----
will render as:
get-command -module BomiArtifactSome languages support syntax highlighting. For example:
[source,java]
----
public class SomeClass extends SomeOtherClass {
    ...
}
----
will render as:
public class SomeClass extends SomeOtherClass {
    ...
}
Callouts can also be added using an appropriate comment syntax. For example:
[source,java]
----
public class SomeClass
                extends SomeOtherClass {        // <1>
    public static void main(String[] args) {    // <2>
        ...
    }
}
----
<1> inherits from `SomeOtherClass`
<2> entry point into the program
will render as:
public class SomeClass
                extends SomeOtherClass {        (1)
    public static void main(String[] args) {    (2)
        ...
    }
}| 1 | inherits from SomeOtherClass |
| 2 | entry point into the program |
and
[source,xml]
----
<a>
    <b c="foo"/>     <!--1-->
</a>
----
<1> some comment
renders as:
<a>
    <b c="foo"/>     (1)
</a>| 1 | some comment |
It’s also possible to include source code snippets; see the guides linked previously
Images
Use the image: macro to reference images.
For example:
image:vscode.png[]
To make the image clickable, add in the link attribute:
image:vscode.png[link="{attachmentsdir}/some-doc.pdf"]
It’s also possible to specify the width using scaledwidth (for PDF/HTML) or width and height (for HTML only).
For example:
image:vscode.png[width="800px"]
Child Documents
Use the include: macro to break up a document into multiple sections.
The leveloffset=+1 means that each included file’s heading levels are automatically adjusted.
The net effect is that all documents can and should use heading 1 as their top-level.
Metadata
The top-level document must include the _basedir attribute; this points to the parent directory src/main/asciidoc.
This attribute is set immediately after the top-level heading.
In addition, the :toc: adds a table of contents.
For example, the setting-up/concepts/concepts.adoc file starts:
[[concepts]]
= Concepts
:_basedir: ../../

...
Diagrams
Asciidoctor supports numerous diagram types through the asciidoctor-kroki plugin.
This calls the kroki online service (it can also be installed to run on-prem) which generates diagrams from textual markup.
PlantUml, PlantUML + C4, ditaa, graphviz and numerous other formats are supported. The sections below provide examples of some of these.
UML diagrams
Asciidoctor includes support for the plantuml, allowing simple UML diagrams to be easily sketched.
|
for much more on the layout of plantuml diagrams, see https://crashedmind.github.io/PlantUMLHitchhikersGuide/layout/layout.html |
For example:
[plantuml]
----
class Car

Driver - Car : drives >
Car *- Wheel : have 4 >
Car -- Person : < owns
----
renders as:
C4 diagrams
Asciidoctor includes support for the c4 model.
For example:
[c4plantuml,c4-demo,svg]
----
@startuml
!includeurl https://raw.githubusercontent.com/RicardoNiepel/C4-PlantUML/master/C4_Container.puml

title System Context diagram for Internet Banking System

Person(customer, "Banking Customer", "A customer of the bank, with personal bank accounts.")
System(banking_system, "Internet Banking System", "Allows customers to check their accounts.")

System_Ext(mail_system, "E-mail system", "The internal Microsoft Exchange e-mail system.")
System_Ext(mainframe, "Mainframe Banking System", "Stores all of the core banking information.")

Rel(customer, banking_system, "Uses")
Rel_Back(customer, mail_system, "Sends e-mails to")
Rel_Neighbor(banking_system, mail_system, "Sends e-mails", "SMTP")
Rel(banking_system, mainframe, "Uses")
@enduml
----
renders as:
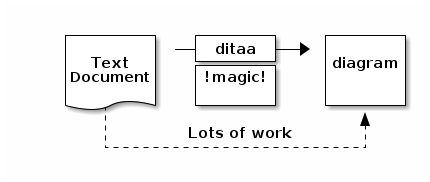
Ditaa diagrams
Asciidoctor includes support for the ditaa, allowing boxes-and-lines diagrams to be easily sketched.
For example:
[ditaa,images/asciidoctor/ditaa-demo,png]
----
    +--------+   +-------+    +-------+
    |        | --+ ditaa +--> |       |
    |  Text  |   +-------+    |diagram|
    |Document|   |!magic!|    |       |
    |     {d}|   |       |    |       |
    +---+----+   +-------+    +-------+
        :                         ^
        |       Lots of work      |
        +-------------------------+
----
renders as:
Graphviz diagrams
Asciidoctor includes support for the ditaa, allowing boxes-and-lines diagrams to be easily sketched.
For example:
[graphviz,images/asciidoctor/graphviz-demo,png]
----
digraph automata_0 {
  size ="8.5, 11";
  node [shape = circle];
  0 [ style = filled, color=lightgrey ];
  2 [ shape = doublecircle ];
  0 -> 2 [ label = "a " ];
  0 -> 1 [ label = "other " ];
  1 -> 2 [ label = "a " ];
  1 -> 1 [ label = "other " ];
  2 -> 2 [ label = "a " ];
  2 -> 1 [ label = "other " ];
  "Machine: a" [ shape = plaintext ];
}
----
renders as:
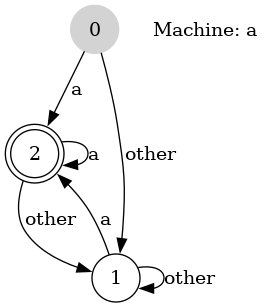
|
This requires graphviz to be installed and the :graphvizdot: c:\Program Files (x86)\Graphviz2.38\bin\dot.exe |
diagrams.net (draw.io) diagrams
Rather than describing diagrams in text format, an alternative is to just draw the diagrams using the diagrams.net editor (previously called draw.io).
You can find an example of a class diagram drawn this way in the internal design docs for core/metamodel module.
If using IntelliJ, the diagrams.net plugin embeds this within the IDE, and works seamlessly with the Asciidoctor plugin.
Diagrams can be saved in either .svg or .png format.