SimpleApp
The quickest way to get started building an application "for real" is to use the simpleapp starter app.
It uses the JPA/Eclipselink object store for persistence.
The application is also built nightly as a docker image, so you can quickly try it out:
docker run -p 8080:8080 apache/causeway-app-simpleapp:latestAs with the HelloWorld starter app, the instructions below will download a minimal Apache Causeway app consisting of a single entity (SimpleObject) with supporting domain services.
However, unlike HelloWorld, this app also provides more structure to assist you as your application grows, with business logic placed in a separate Maven module (simpleapp-jpa-module-simple) to the module that bootstraps the webapp (simpleapp-jpa-webapp).
The idea is that as your application grows in scope that you put each new area of functionality in its own module (copy-n-paste the simpleapp-jpa-module-simple module).
These modules can depend on each other, but Maven will to ensure that dependencies between these areas of functionality are unidirectional.
In this way your application will be a "modular monolith"; said another way it will prevent your application from degenerating into a big ball of mud.
See also the discussion below.
The application also includes examples of unit tests and integration tests.
You’ll find these in their own Maven modules (simpleapp-jpa-module-simple-tests and simpleapp-jpa-webapp-tests).
Normally we recommend that tests should be in the same Maven module as the code that they exercise.
The simpleapp doesn’t do it this way just to give you the option to exclude them while initially prototyping/exploring a domain.
You can use them as a reference once your ideas have solidifid and you need to start writing proper "production" code.
Prerequisites
Apache Causeway is a Java based framework, so in terms of prerequisites, you’ll need to install:
-
Java 21 JDK (or later)
Apache Causeway v4 requires Java 17, and the simpleapp itself is currently configured for Java 21.
-
Apache Maven 3.9.11+
Downloading & Running
Create a new directory, and cd into that directory.
To build the app from the latest release:
curl https://codeload.github.com/apache/causeway-app-simpleapp/zip/v4-jpa | jar xv
cd causeway-app-simpleapp-4-jpa

mvn clean install
mvn -pl webapp spring-boot:run
Either way, this should only take a few seconds to download, compile and run. Then browse to http://localhost:8080, and read on.
Using the App
When you start the app, you’ll be presented with a welcome page from which you can access the webapp using either the generic UI provided by Web UI (Wicket viewer) or use Swagger to access the REST API (Restful Objects viewer):
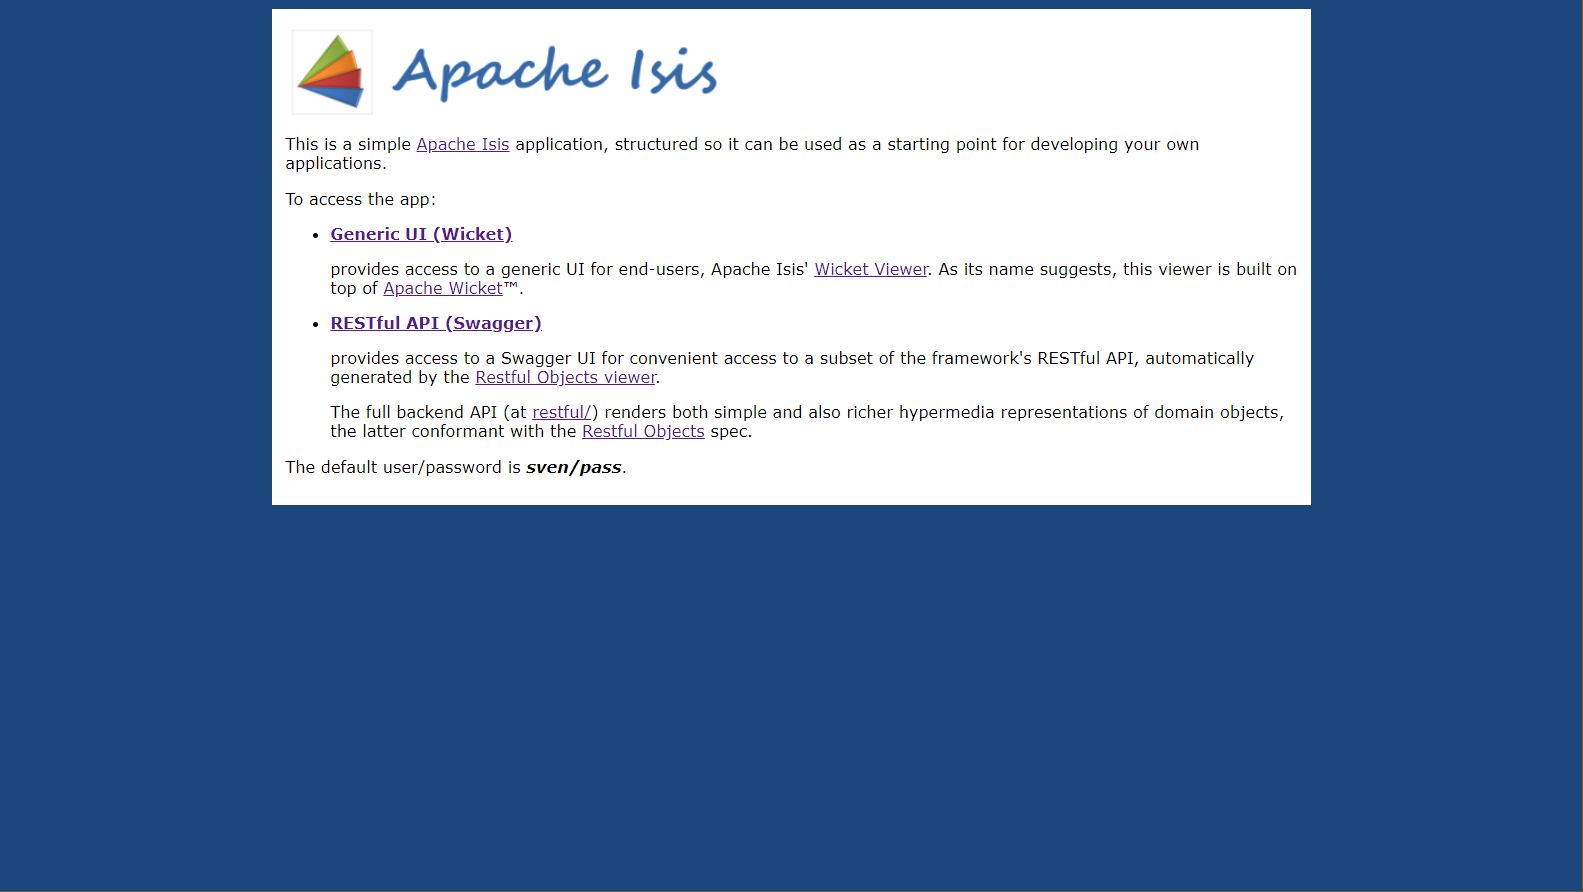
Choose the generic Wicket UI, and navigate to the login page:
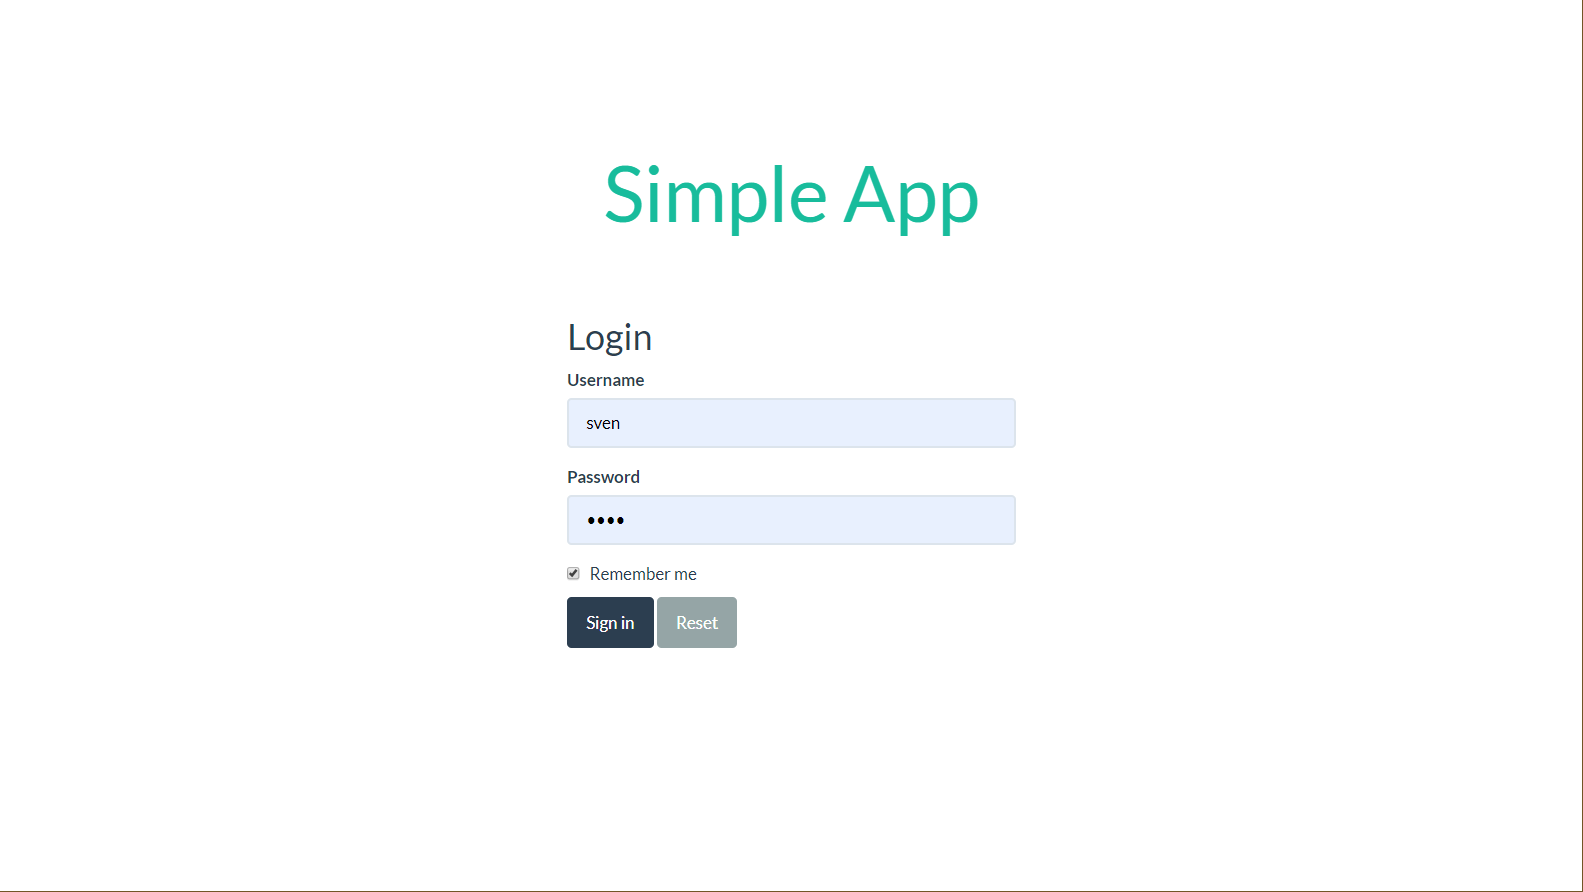
The app itself is configured to run using Simple security module, with the SimpleRealm bean defining the users and roles.
You can log in with:
-
username: sven
-
password: pass
Wicket viewer
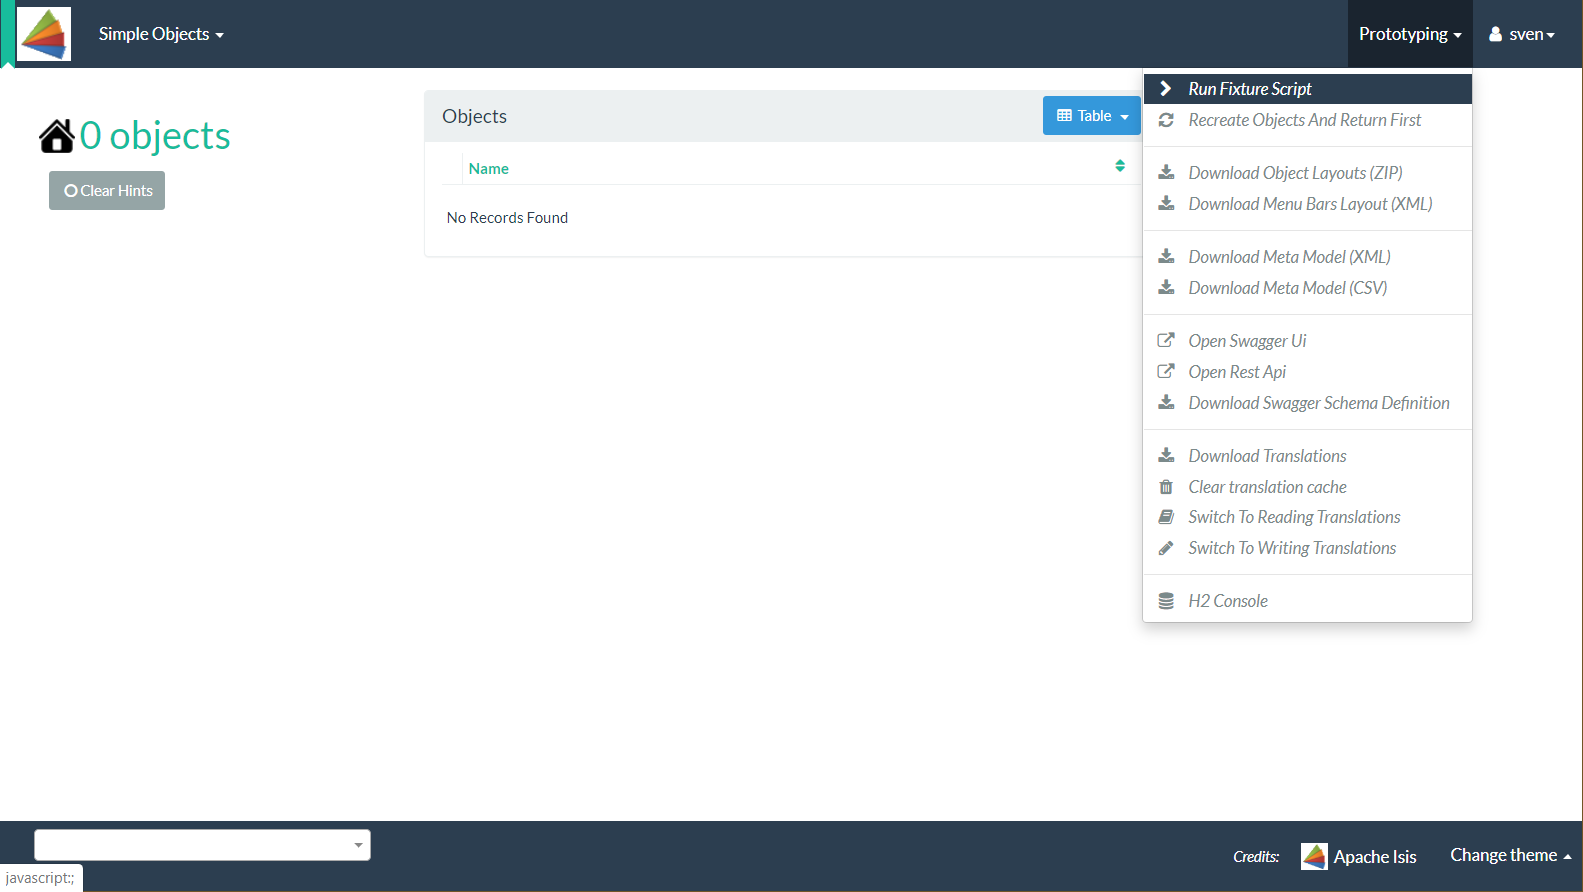
Once you’ve logged in you’ll see the default home page:

This is a view model annotated with @HomePage:
@Named("domainapp.HomePageViewModel")
@DomainObject( nature = Nature.VIEW_MODE )
@HomePage
public class HomePageViewModel {

    public String title() {                             (1)
        return return getObjects().size() + " objects";
    }

    public List<SimpleObject> getObjects() {            (2)
        return simpleObjects.listAll();
    }

    @Inject SimpleObjects simpleObjects;                (3)
}| 1 | identifies or describes the object |
| 2 | collection of objects shown on the page |
| 3 | automatically injected by the framework |
Fixtures
When prototyping against an in-memory database, it’s useful to have a mechanism to create some initial state. This can be done using fixture scripts, accessible from the :
This brings up a dialog to select the fixture script:
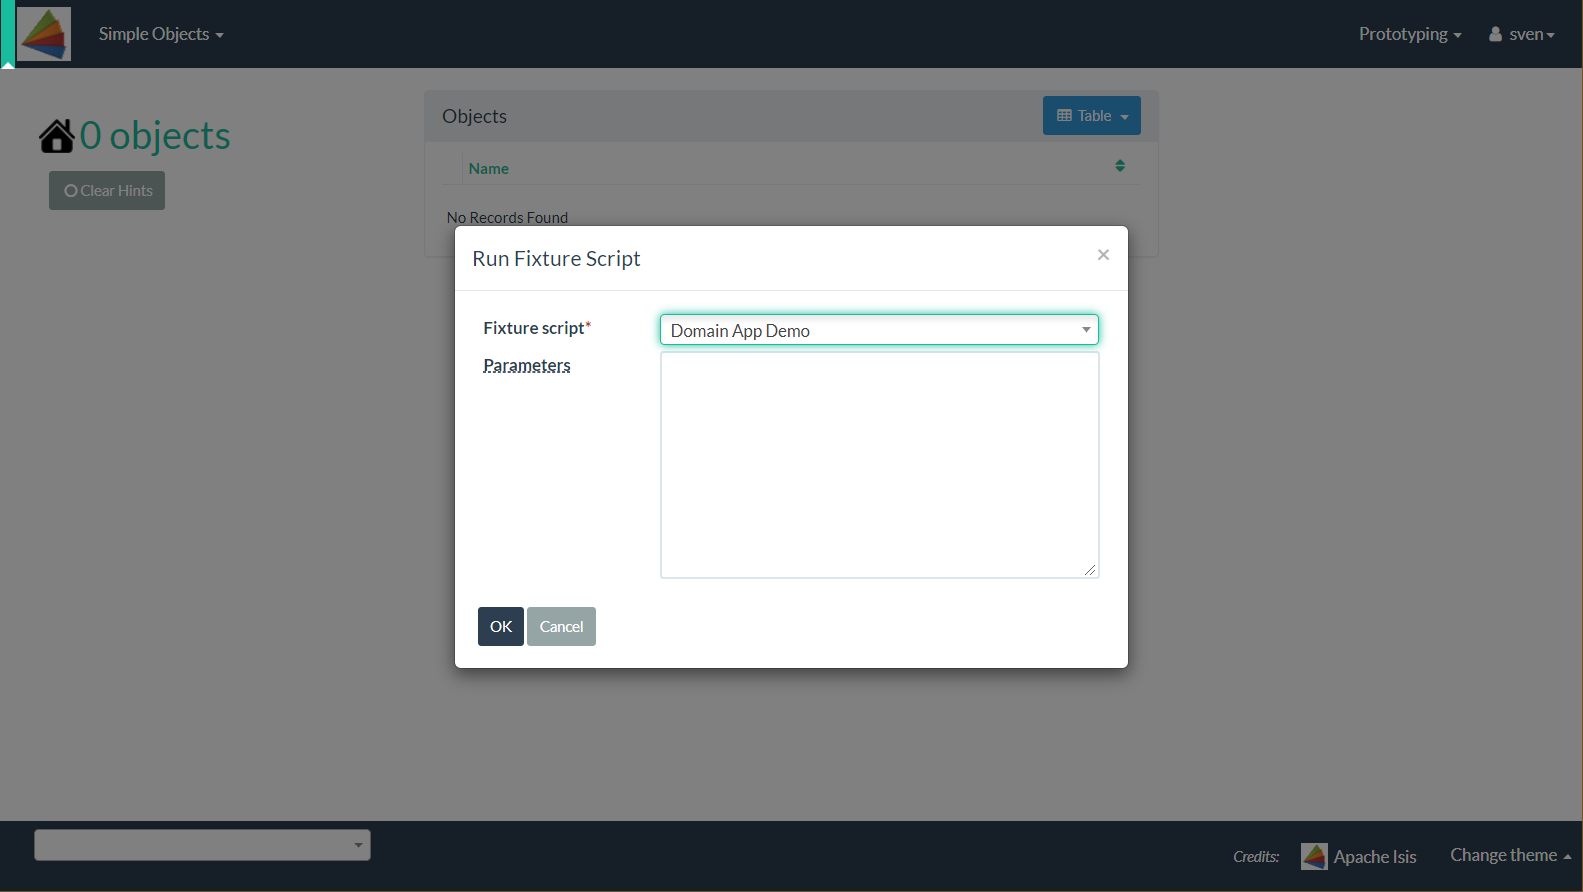
The "Domain App Demo" in the drop-down refers to this code:
public class DomainAppDemo extends FixtureScript {

    @Override
    protected void execute(final ExecutionContext ec) {
        ec.executeChildren(this,
            moduleWithFixturesService.getTeardownFixture());        (1)
        ec.executeChild(this,
            new SimpleObject_persona.PersistAll());                 (2)
    }

    @Inject ModuleWithFixturesService moduleWithFixturesService;

}| 1 | uses injected service to tear down all objects. (Each module provides a teardown script; these are run in the correct sequence). |
| 2 | Creates new objects |
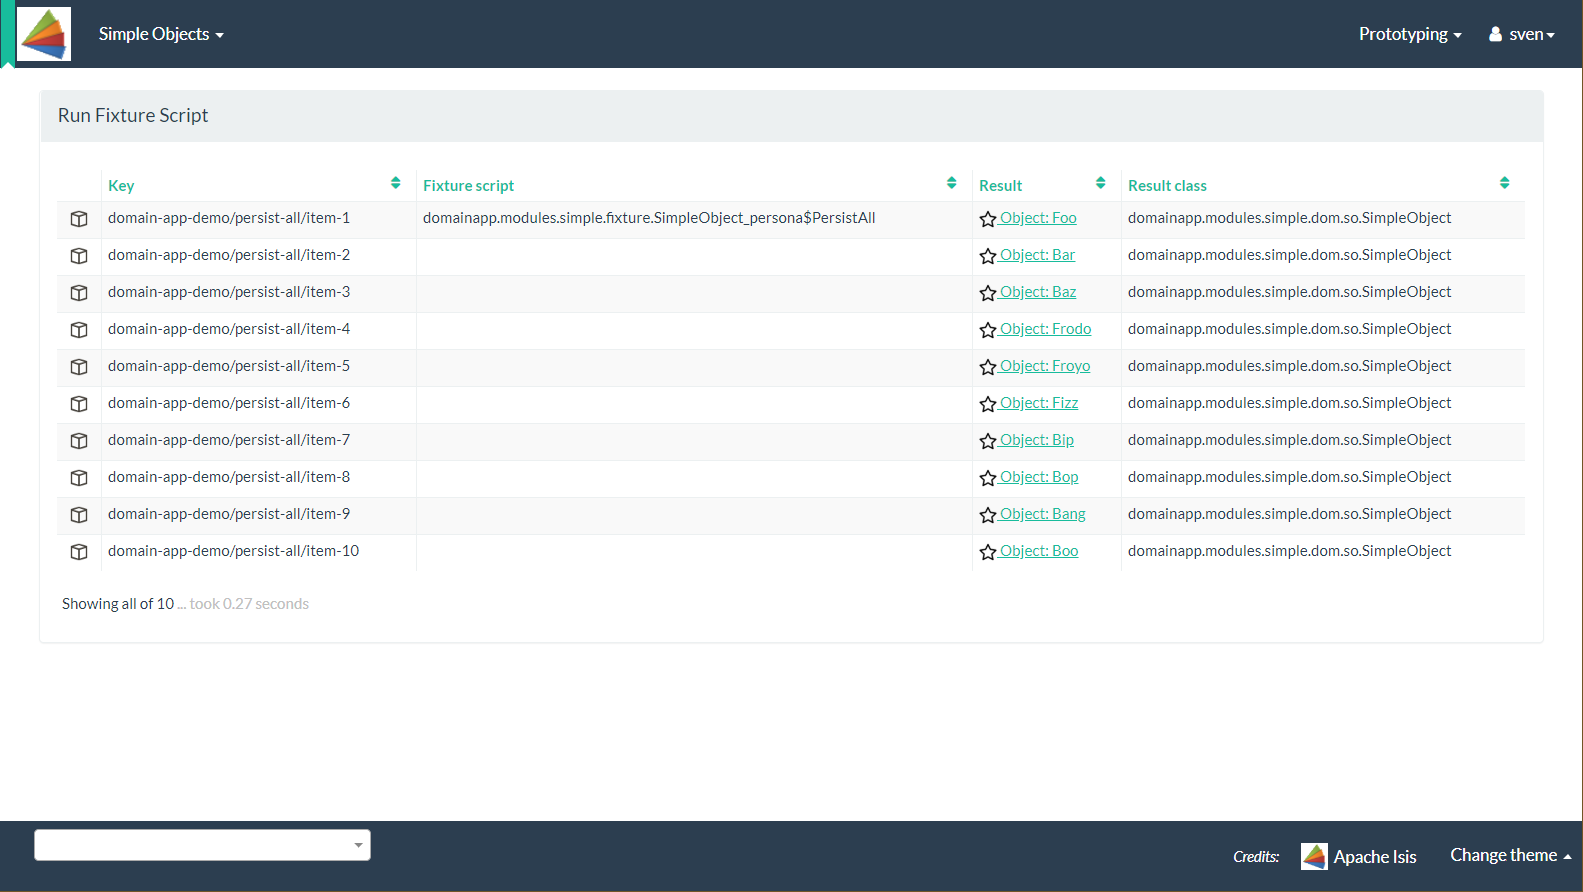
When executed, all objects created by the fixture are listed:
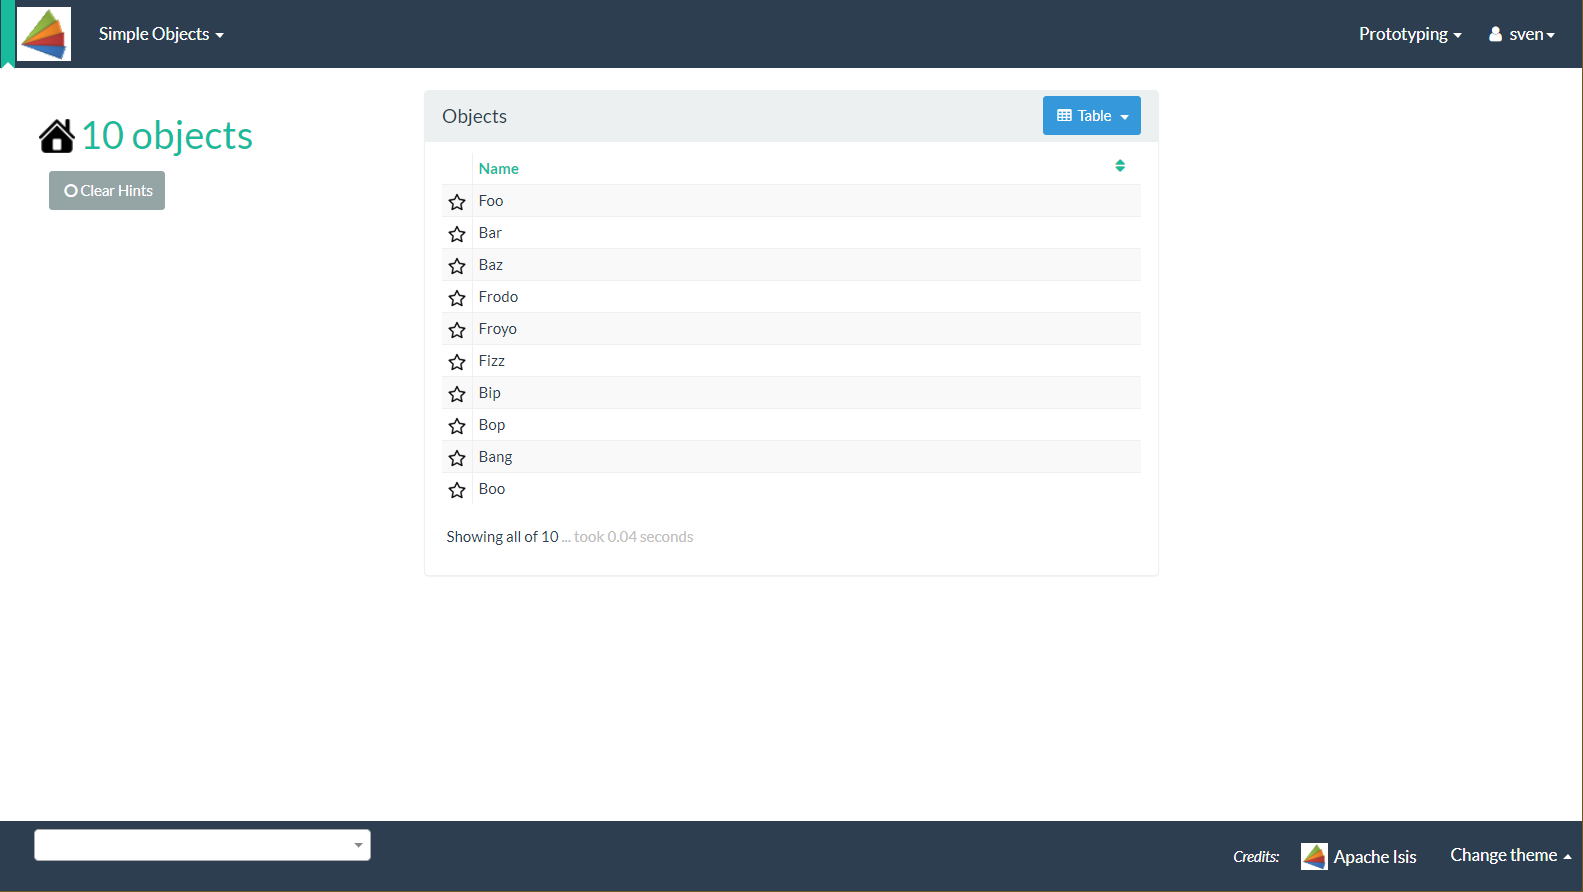
Navigating back to the home page shows the newly created objects:
As well as running in fixtures from the UI, you can also specify a configuration property to run a fixture script as part of the application start-up:
causeway.testing.fixtures.initial-script = \
    domainapp.webapp.application.fixture.scenarios.DomainAppDemo
Create an object
You can also of course create new objects:
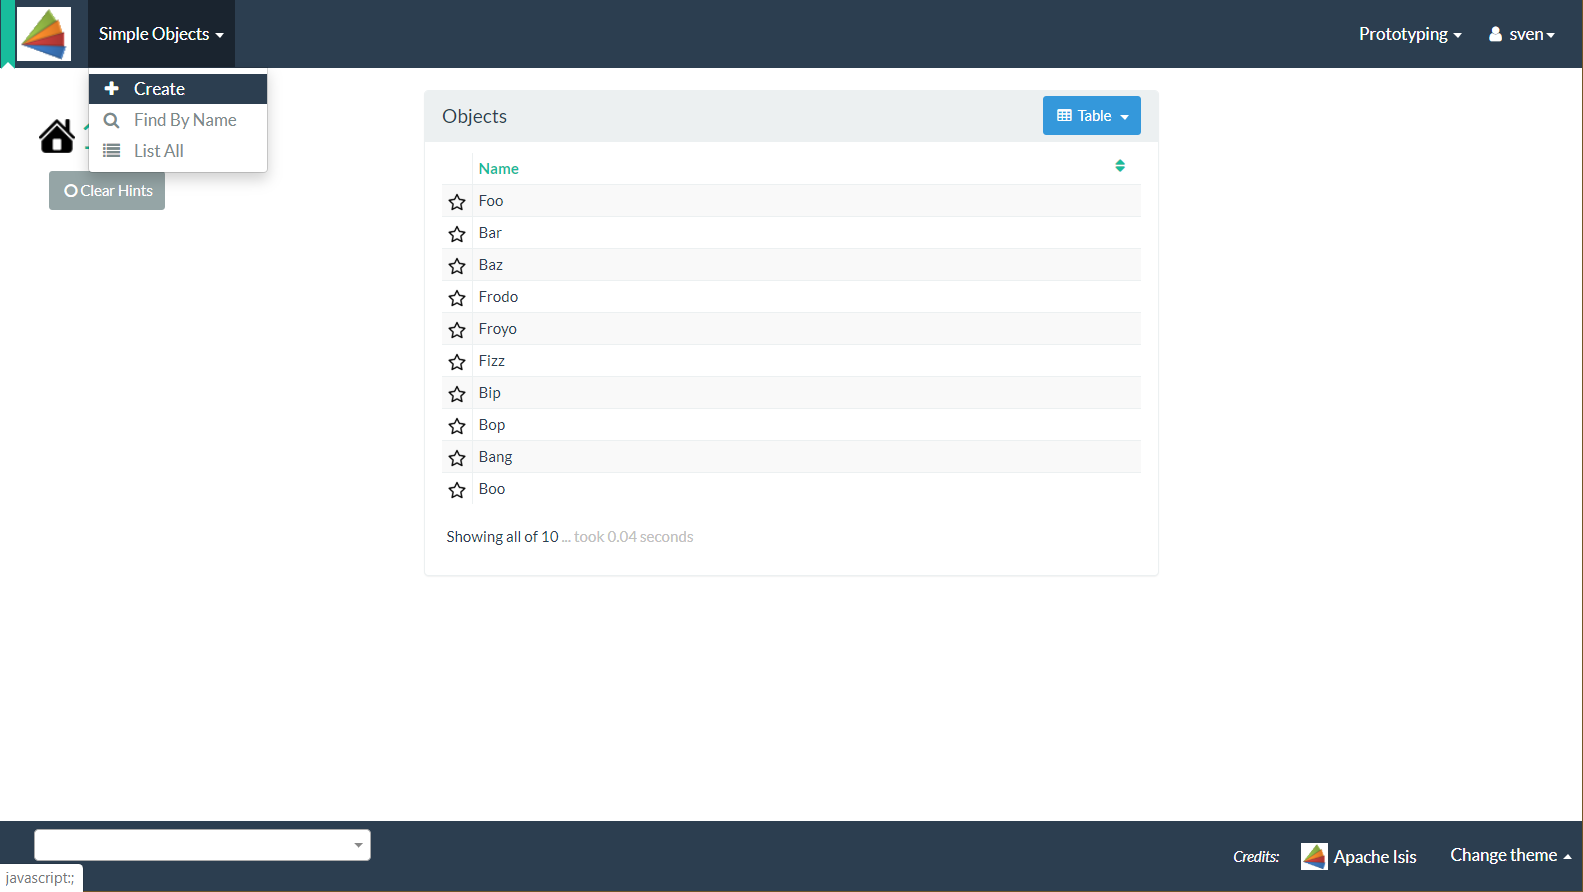
To avoid obscuring the current page, this is configured to bring up a sidebar dialog:
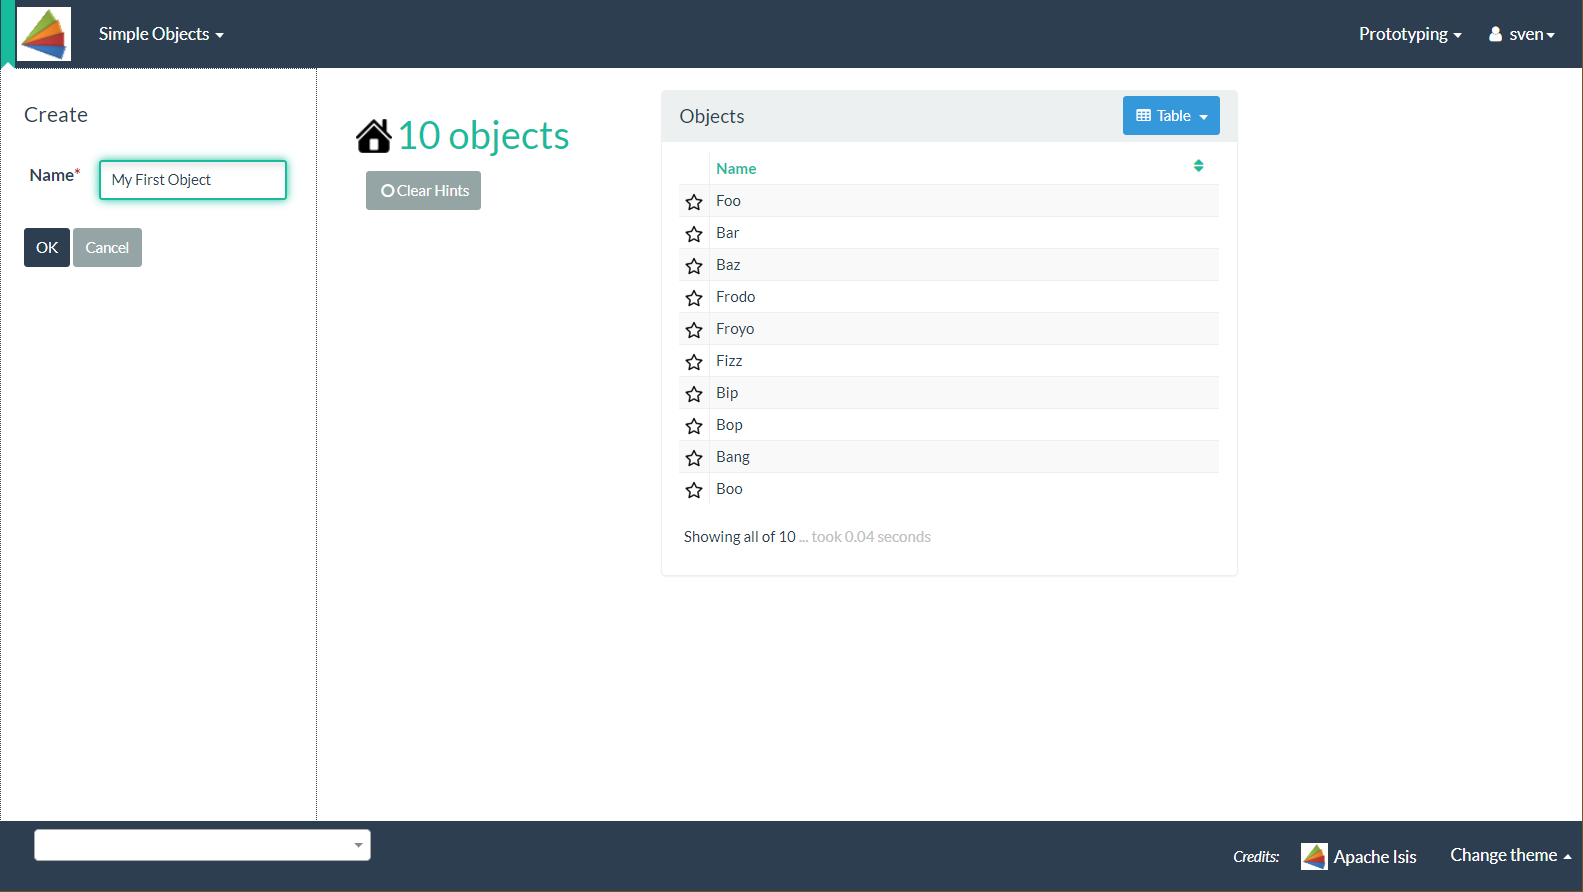
Hitting OK returns the created object:
The above functionality is implemented by this code (in the SimpleObjects menu domain service):
@Action(semantics = SemanticsOf.NON_IDEMPOTENT)                     (1)
@ActionLayout(promptStyle = PromptStyle.DIALOG_SIDEBAR)             (2)
public SimpleObject create(
        @Name final String name) {                                  (3)
    return repositoryService.persist(SimpleObject.ofName(name));
}| 1 | Specifying semantics is recommended, as it changes the HTTP method that is used if the action is invoked through the REST API. |
| 2 | Prompt styles such as modal or sidebar can be specified per action, or globally in application.yml file. |
| 3 | The @Name annotation is actually a meta-annotation, meaning that a number of additional semantics (length, layout, validation etc.) are inferred. |
Invoke an action
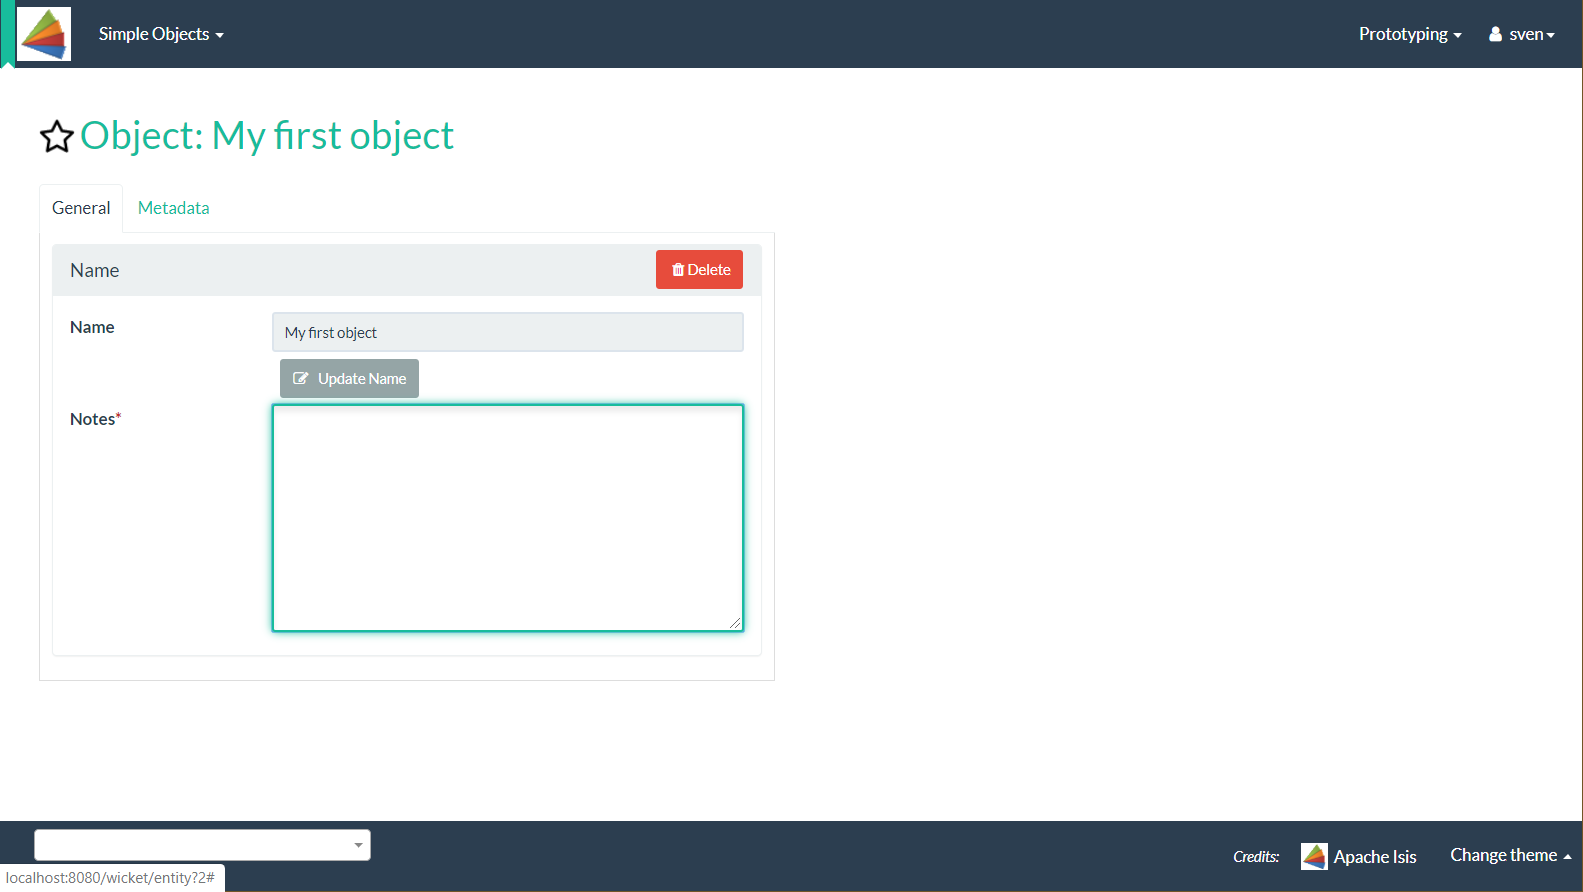
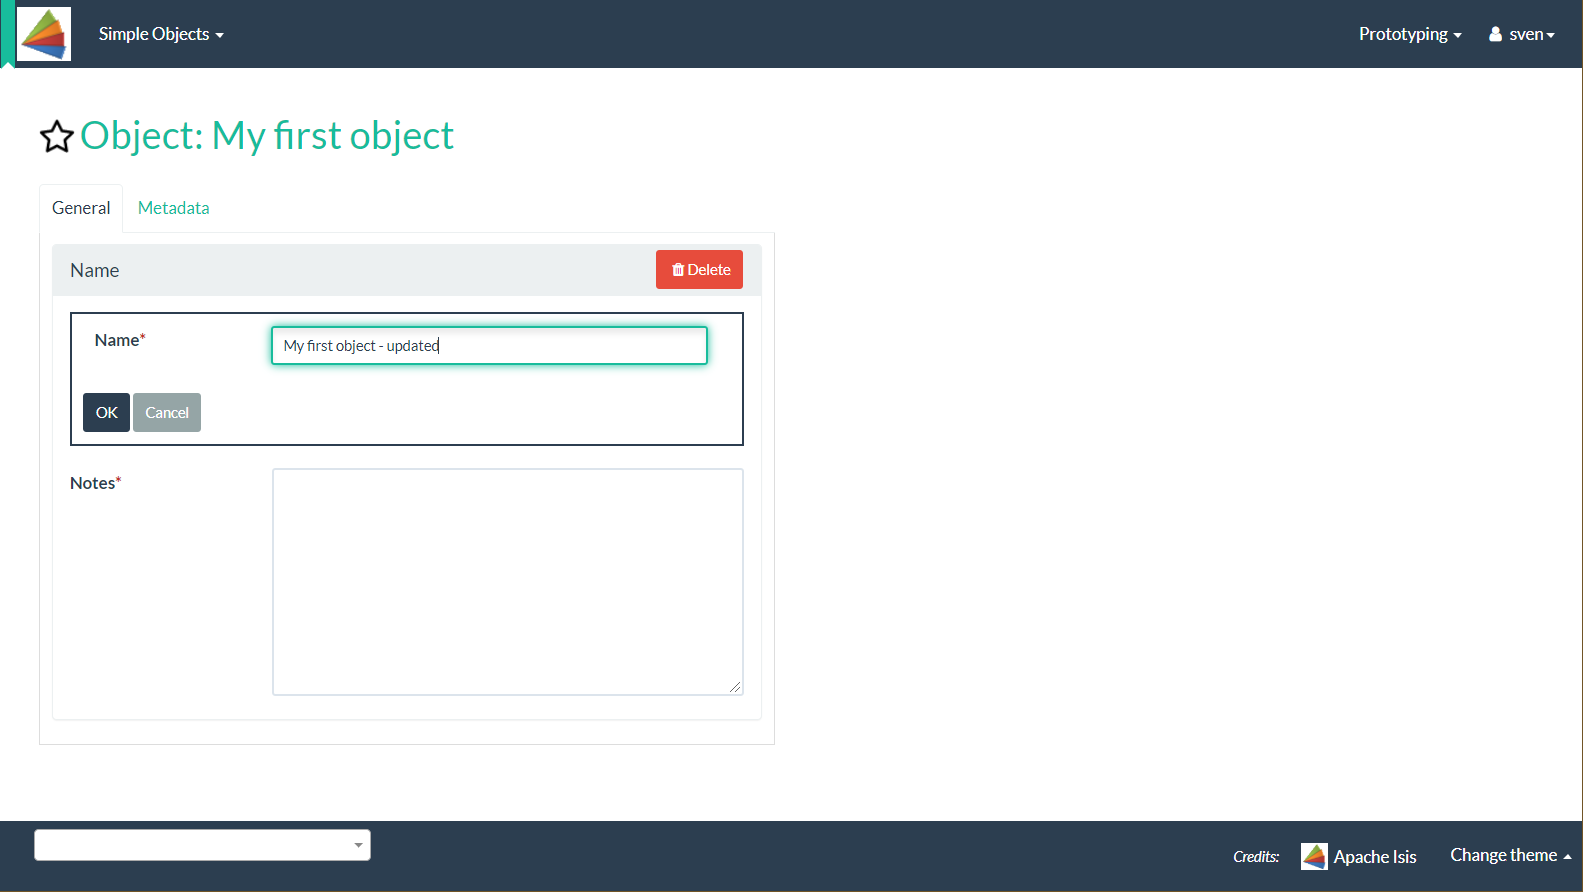
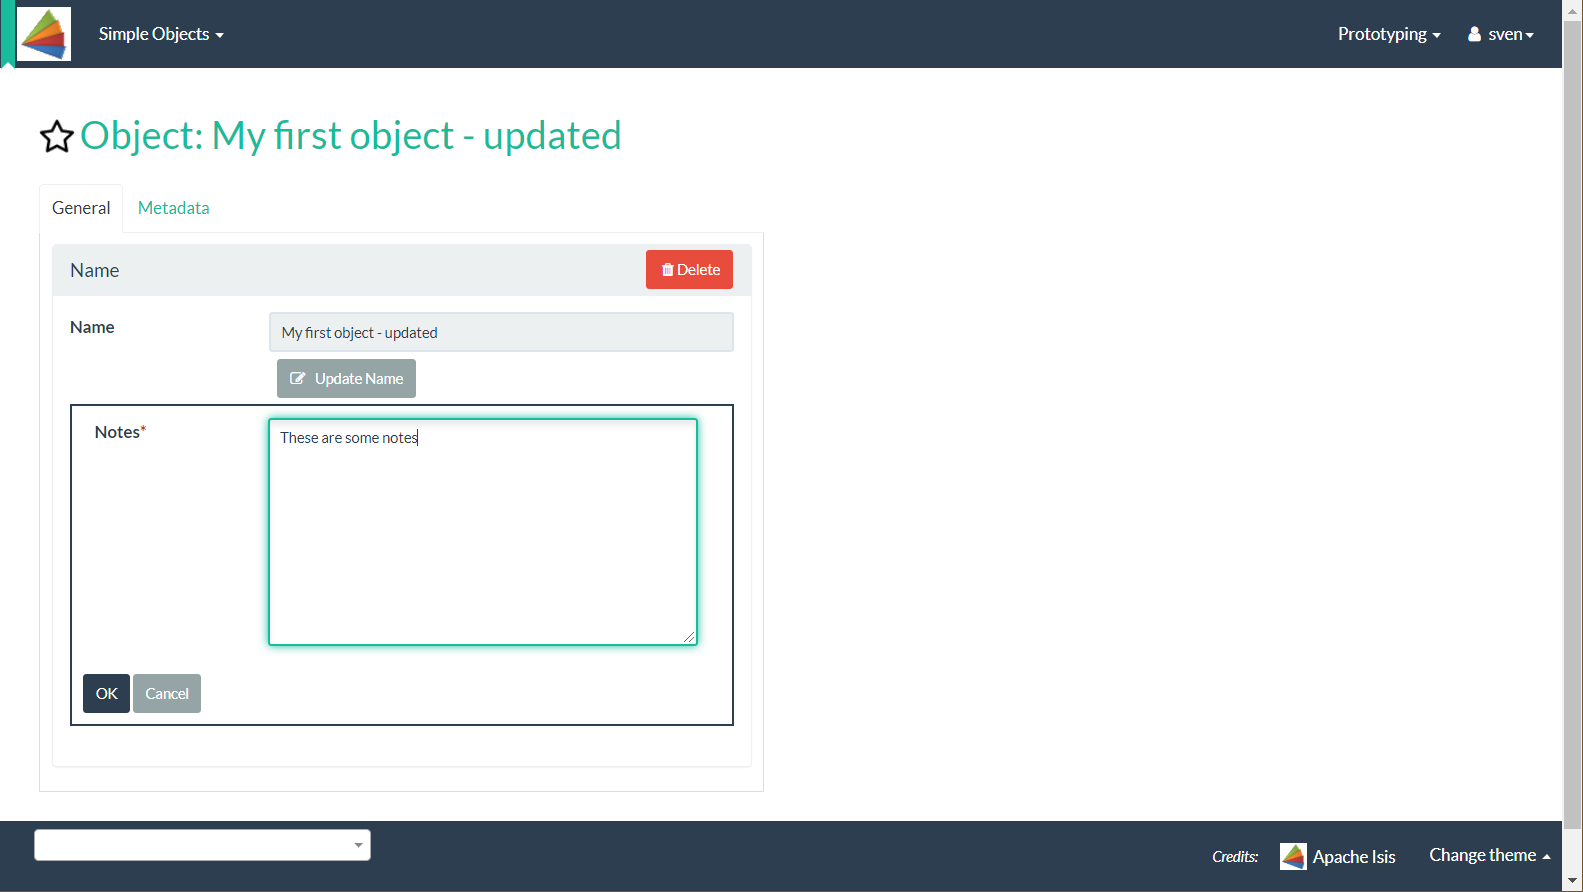
The SimpleObject contains a couple of properties, and a single action to update that property.
The name property is read-only, and can only be modified using the updateName action:
The above functionality is implemented by this code (in the SimpleObject entity):
@Action(semantics = IDEMPOTENT, commandPublishing = Publishing.ENABLED, executionPublishing = Publishing.ENABLED)
@ActionLayout(
        associateWith = "name", promptStyle = PromptStyle.INLINE,
        describedAs = "Updates the name of this object, certain characters (" + PROHIBITED_CHARACTERS + ") are not allowed."
)
public SimpleObject updateName(
        @Name final String name) {
    setName(name);
    return this;
}
public String default0UpdateName() {
    return getName();
}
Actions requiring confirmations
It’s also possible to delete an object:
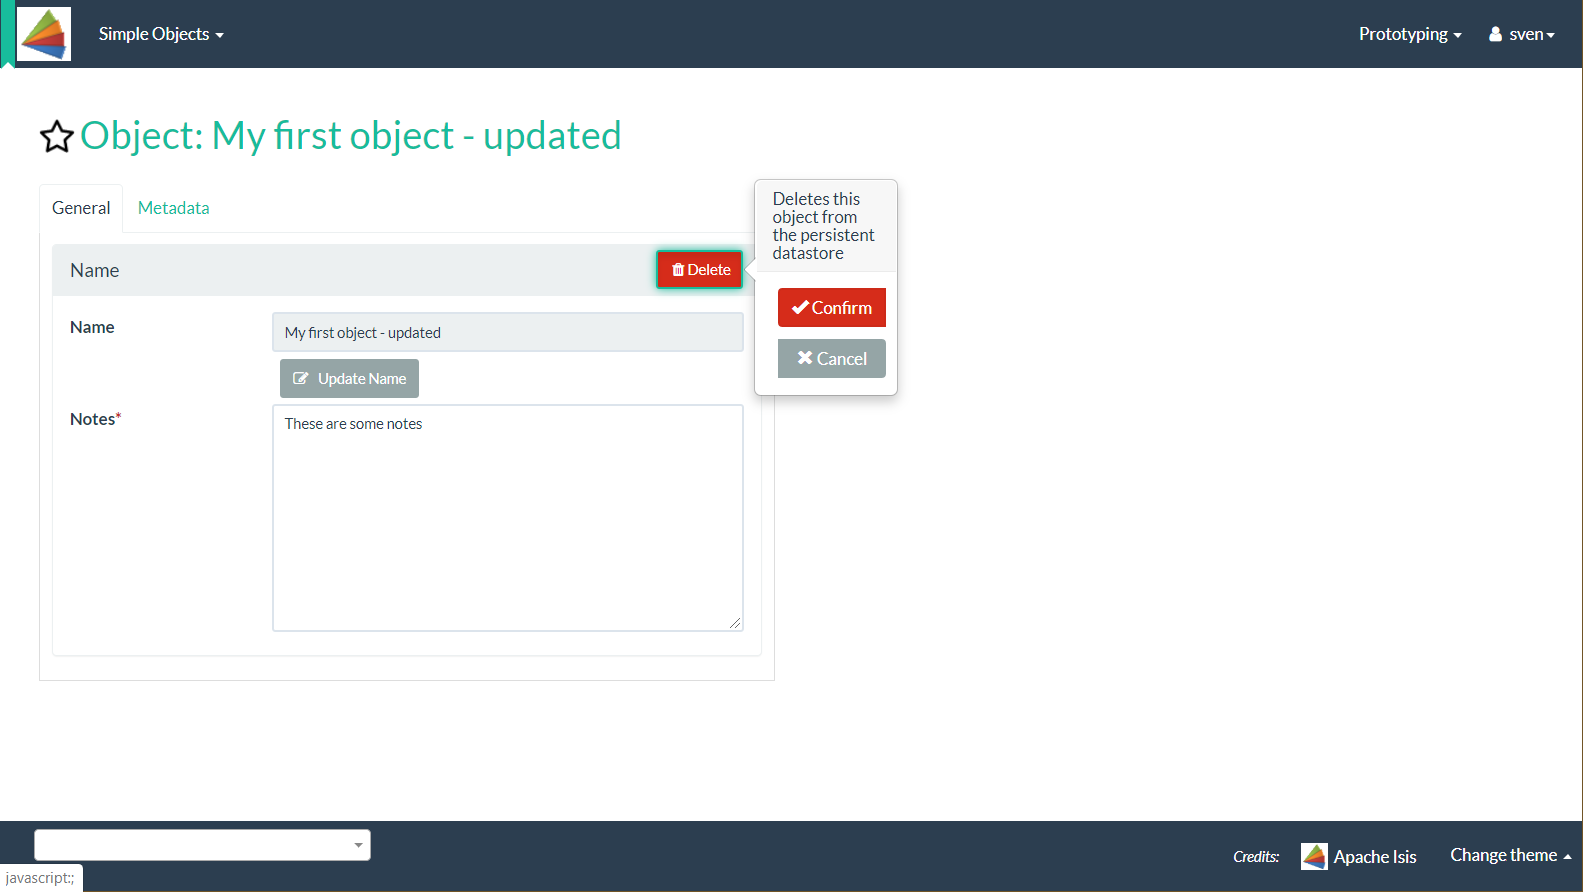
The viewer displays a message confirming that the object has been deleted:
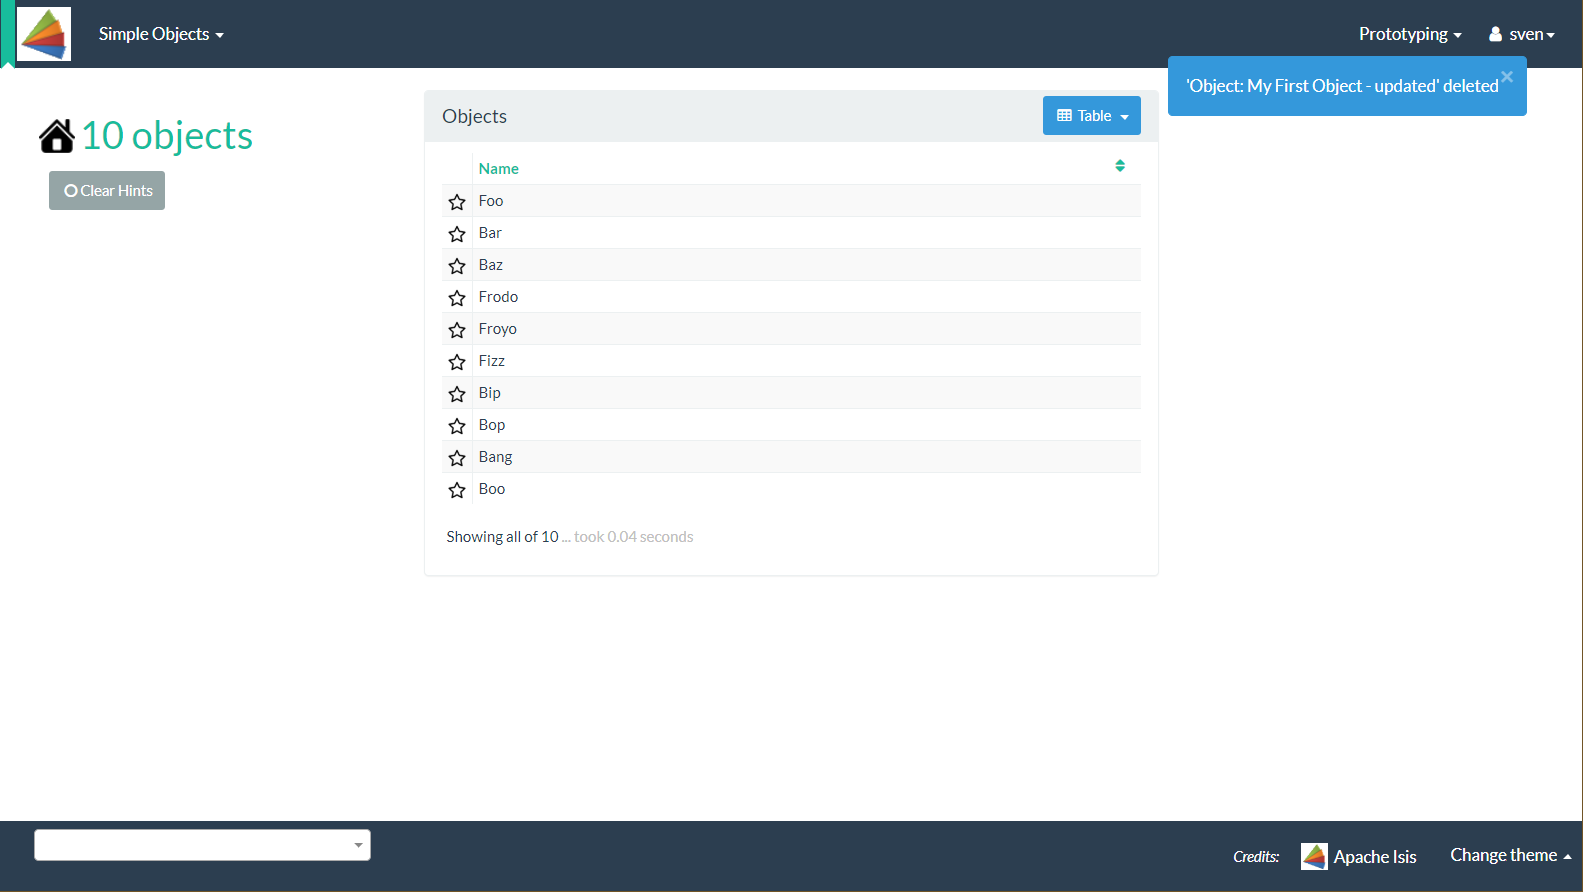
The above functionality is implemented by this code (in the`SimpleObject` entity):
@Action(semantics = NON_IDEMPOTENT_ARE_YOU_SURE)                        (1)
public void delete() {
    final String title = titleService.titleOf(this);                    (2)
    messageService.informUser(String.format("'%s' deleted", title));
    repositoryService.removeAndFlush(this);
}| 1 | Requires the user to confirm the action |
| 2 | The action’s implementation uses three services provided by the framework; these are injected into the domain object automatically. |
Swagger (Restful Objects)
| if invoking an action using Swagger returns a 401 (unauthorised), then navigate to the REST API directly (http://localhost:8080/restful to authenticate the browser first]). |
Using menu item (or just going back to the home page at localhost:8080) we can use Swagger UI as a front-end to the REST API provided by the Restful Objects viewer.
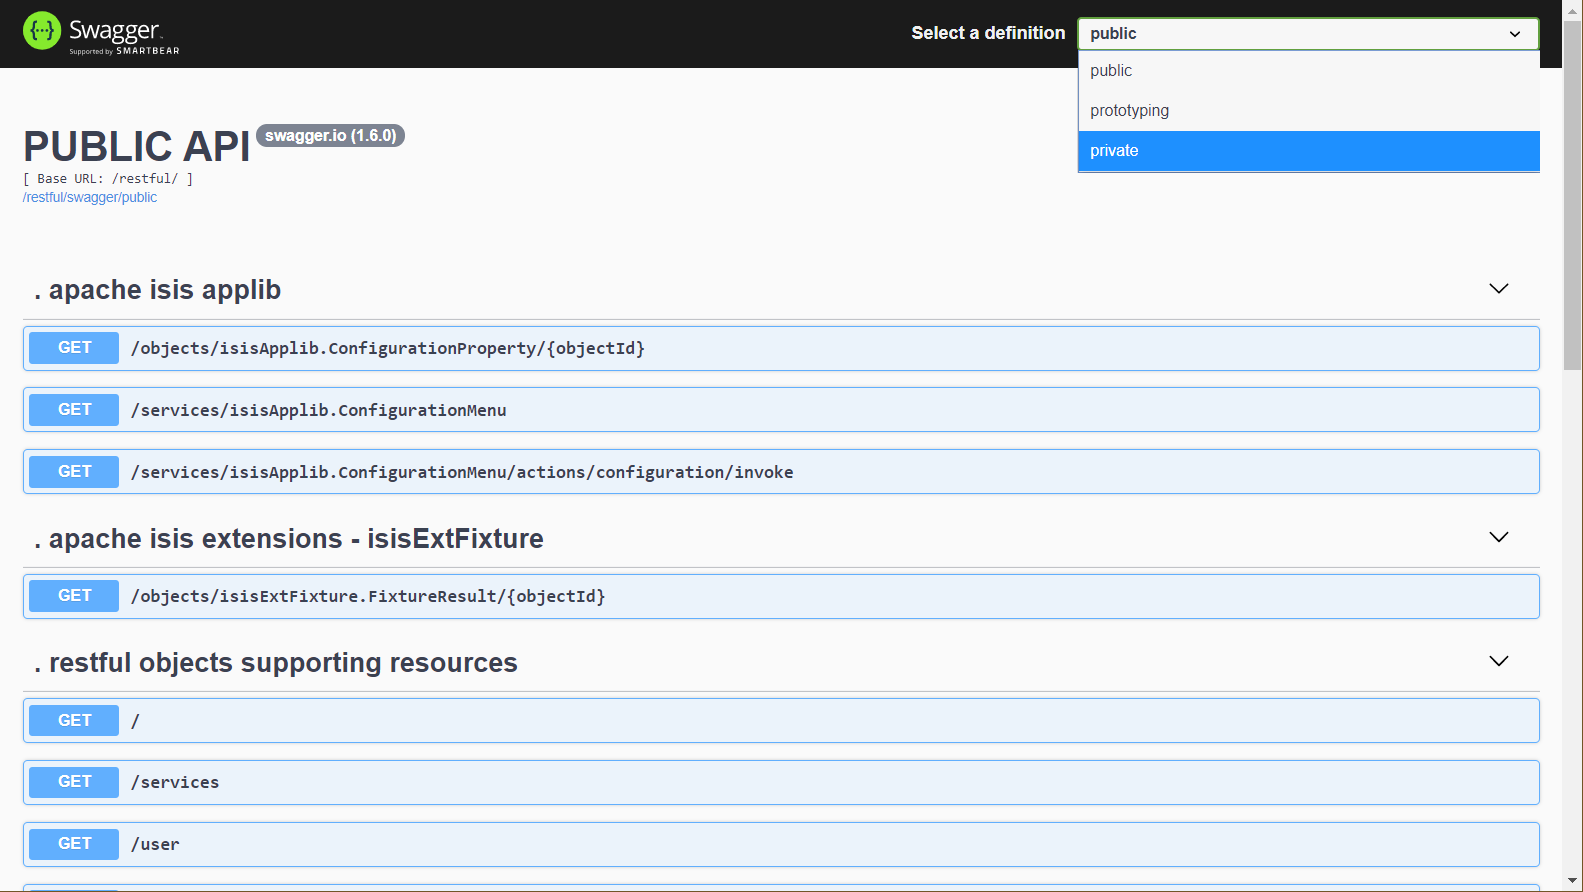
The public API (where the calling client is assumed to be 3rd party) only exposes view models, not entities. If the API is private (or for prototyping), then resources corresponding to entities are also exposed:
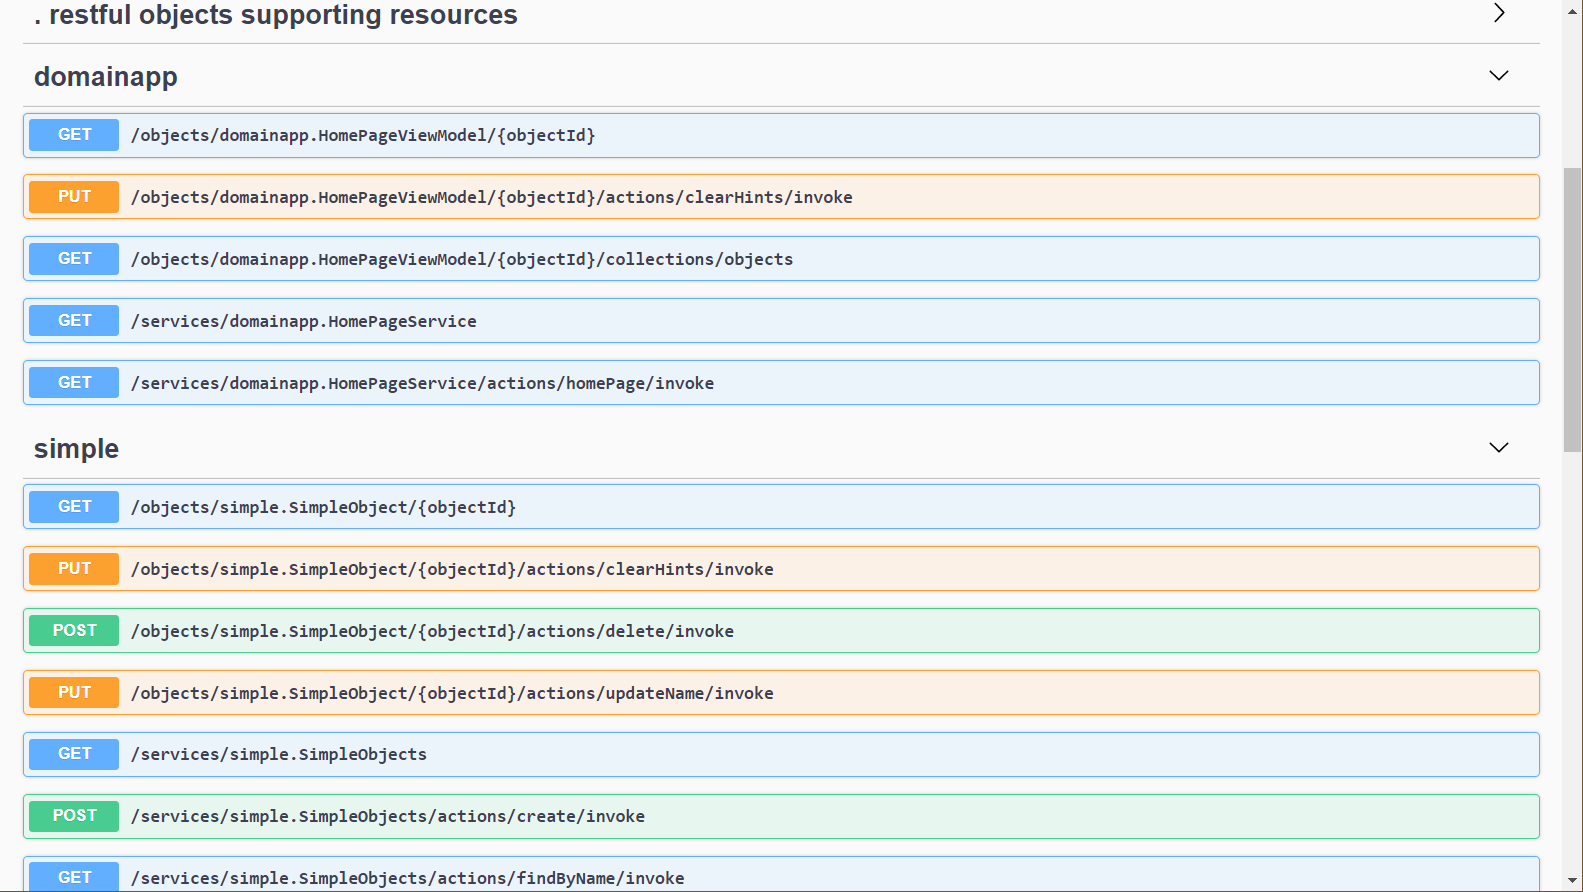
For example, an object can be created using the resource that represents the SimpleObjects#create action:
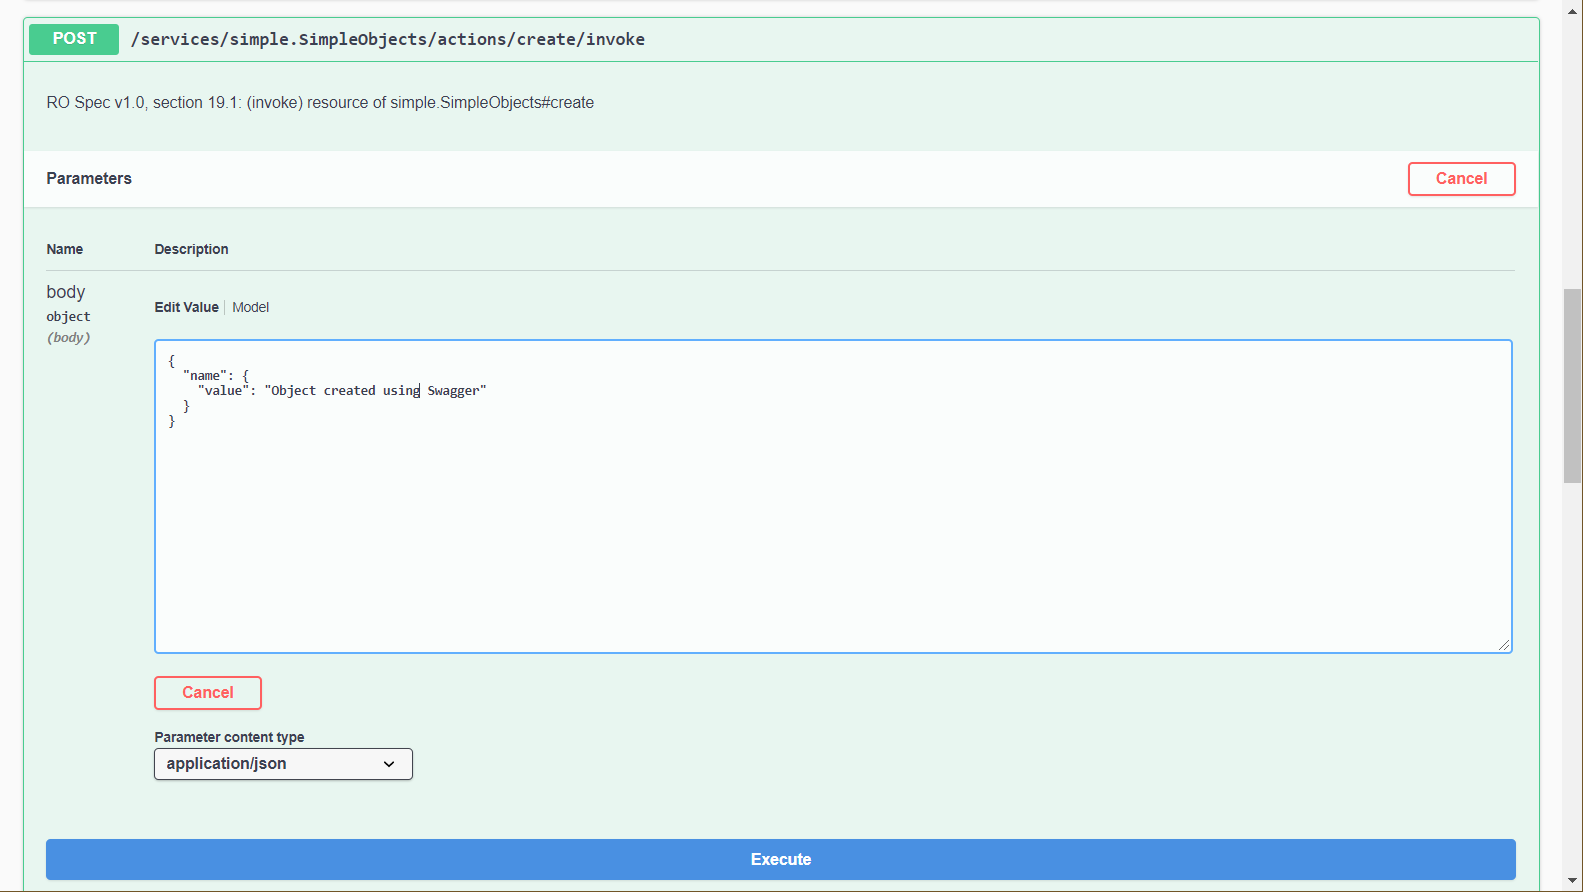
The response indicates that the object was successfully created:
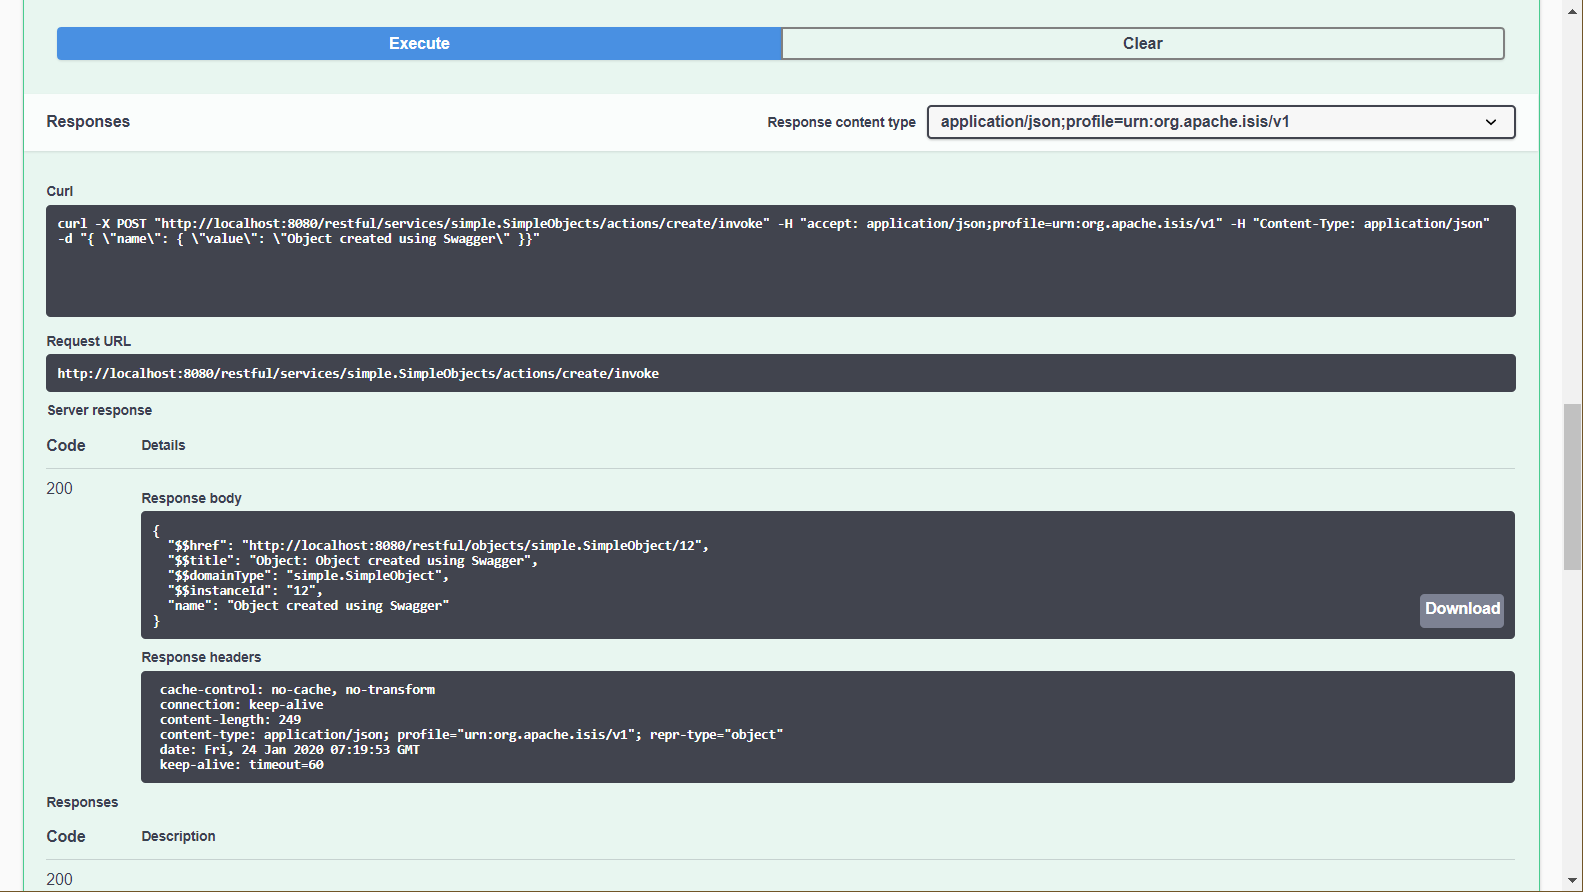
The Swagger UI also provides a resource to retrieve any object:
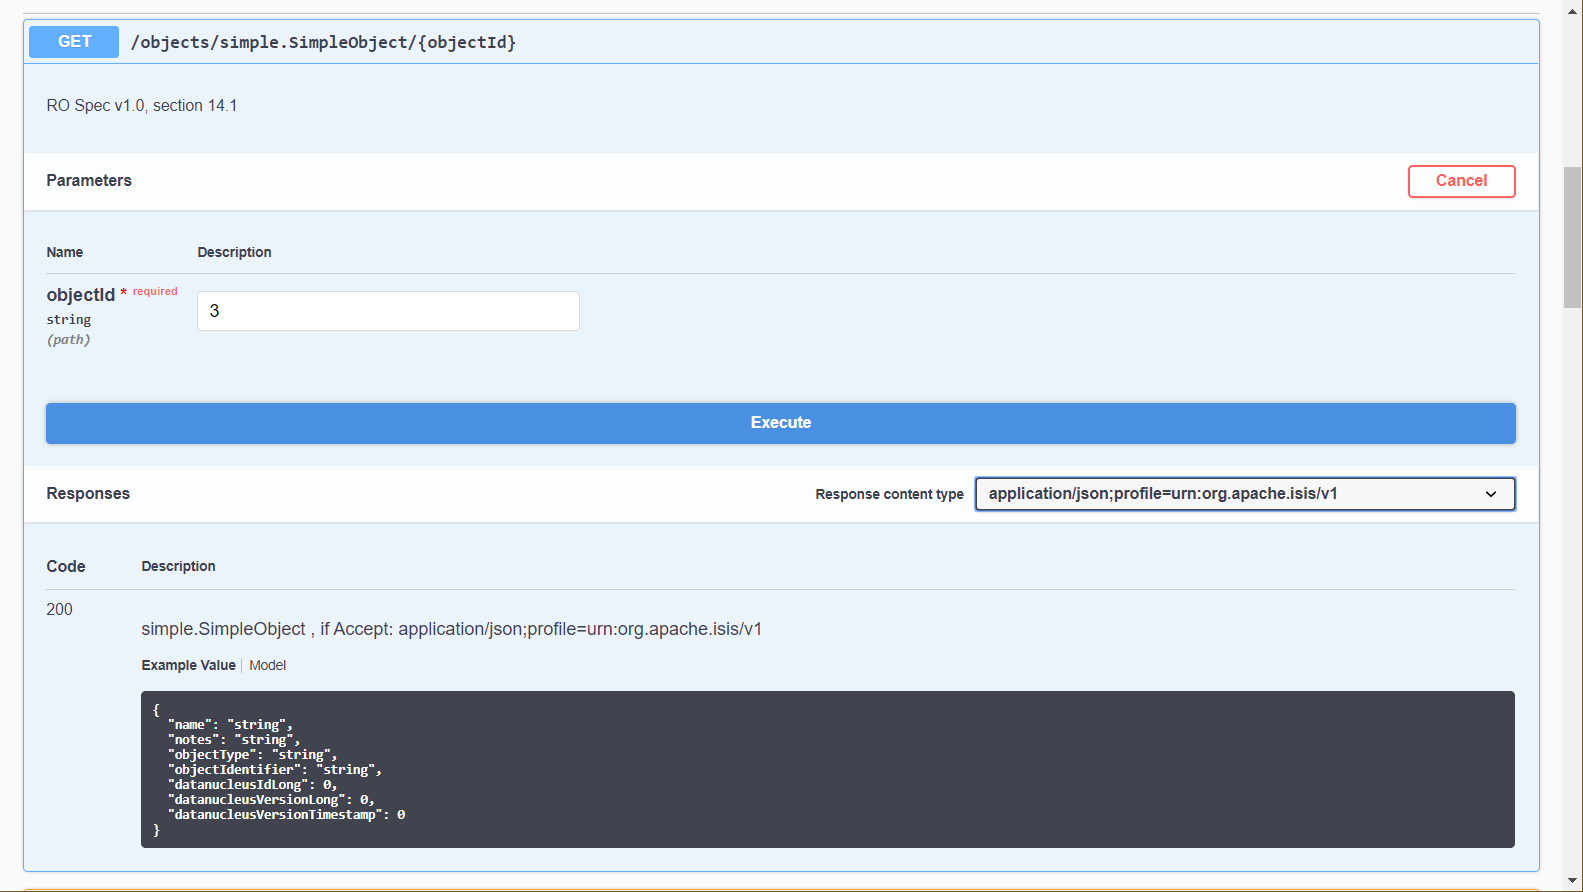
This results in a representation of the domain object (as per the requested Response Content Type, ie ACCEPT header):
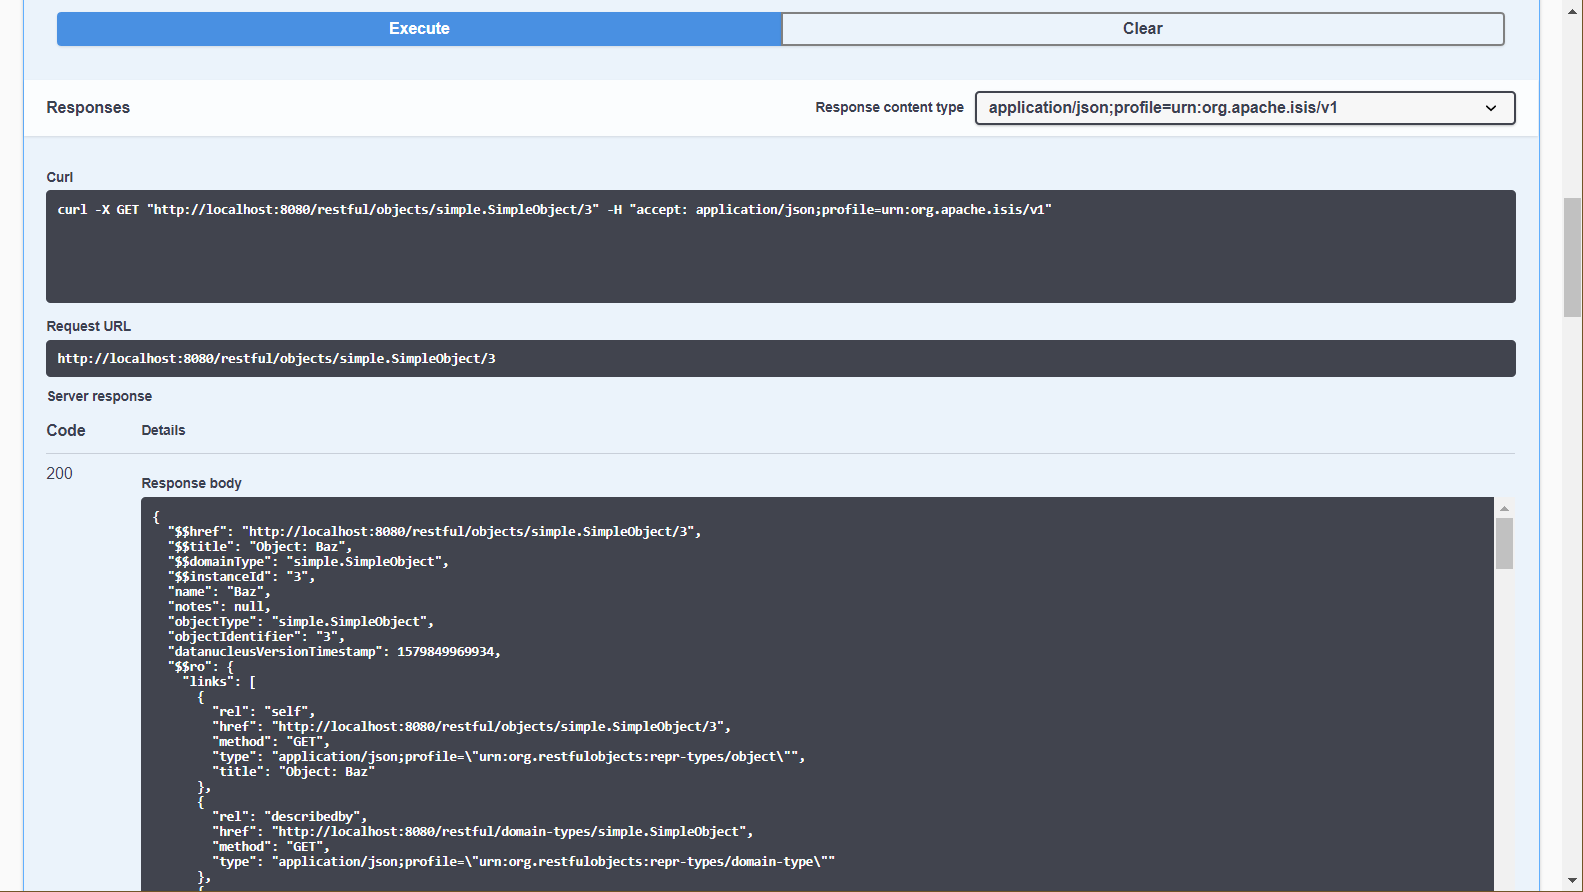
The Swagger UI is provided as a convenience; the REST API is actually a complete hypermedia API (in other words you can follow the links to access all the behaviour exposed in the regular Wicket app). The REST API implemented by Apache Causeway is specified in the Restful Object spec.
Structure of the App
The simpleapp starter app is a multi-module project, structured so that you easily extend it as your application grows.
Application Modules
The application consists of five modules:
The main business logic resides in module-jpa-simple, with the webapp module acting as an aggregator.
Each of these modules have unit and/or integration tests.
To allow them to be easily excluded (while prototyping/exploration), they have been placed into their own respective modules.
The (non-test) Maven modules each contain exactly one @Configuration class, residing at the package root for that Maven module. The location of this class is used for classpath scanning.
In a larger application there would likely be many more modules containing these domain object modules.
For example, you might have a module-customer holding a Customer entity and related entities/services, a module-product holding a Product catalog, and a module-order to hold the Orders placed by Customers:
We can use Maven dependency management to ensure that there are no cyclic dependencies (order "knows about" product but product does not know about orders) and ensure that the codebase remains decoupled. If Java9 modules become commonplace, we’ll also be able to restrict visibility of classes between modules.
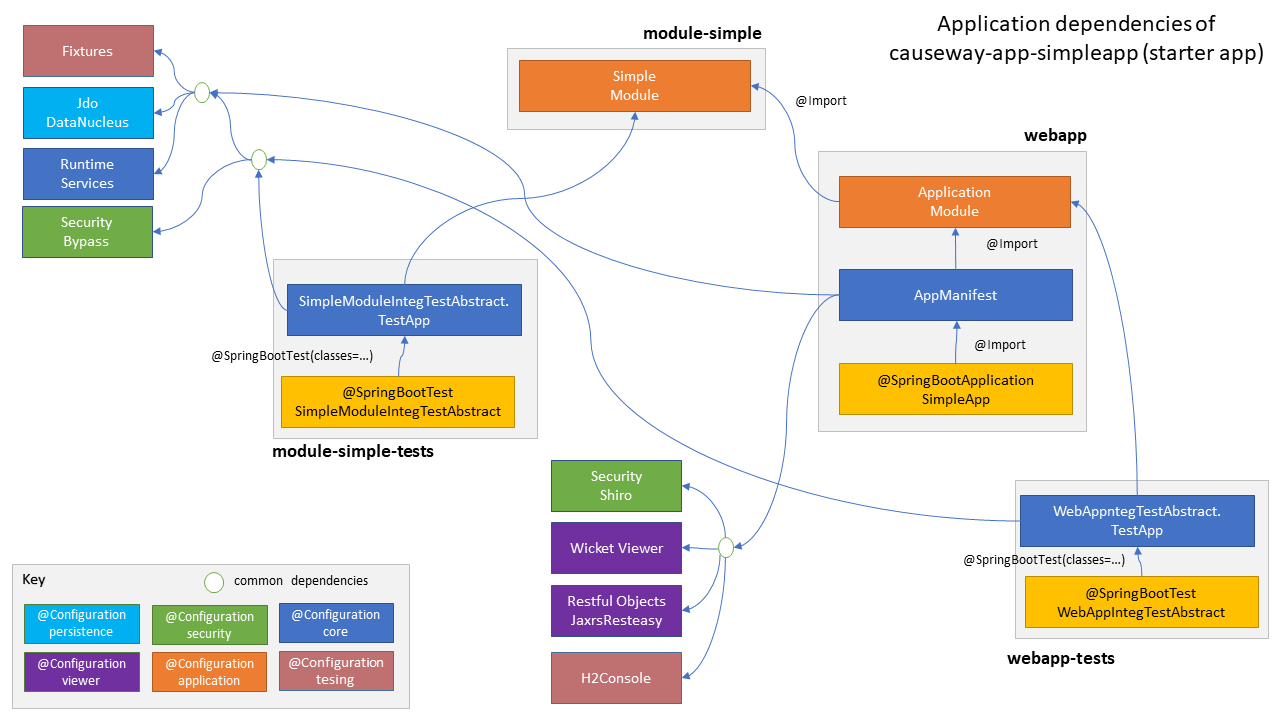
Bootstrapping & Framework Modules
One of the main responsibilities of Spring Boot is - naturally enough - to bootstrap the application. For the webapp, this is done using a class annotated with @SpringBootApplication. For integration tests, this uses the @SpringBootTest annotation.
These two different annotations reference a (class annotated with) @Configuration, which in turn can @Import other annotations.
By convention, the top-level @Configuration in an Apache Causeway application is called the "app manifest".
The diagram below shows how classes fit together:
Let’s now review the contents of each of the modules in the simpleapp starter app.
module-jpa-simple’s src/main/java
Under src/main/java we have:
src/main/java/
  domainapp/                            (1)
    modules/
      simple/                           (2)
        dom/                            (3)
          so/                           (4)
            SimpleObject.java
            SimpleObject.layout.xml
            SimpleObject.png
            SimpleObjectRepository.java (5)
            SimpleObjects.java
        fixture/                        (6)
          SimpleObject_persona.java
          SimpleObjectBuilder.java
        types/                          (7)
          Name.java
          Notes.java
SimpleModule.java (8)| 1 | For simplicity, all the Java source files reside in a domainapp top-level package.
Change as required. |
| 2 | Top level package for the 'simple' module. |
| 3 | The dom subpackage holds the "domain object model" for this module.
Modules may have other subpackages, common ones include types and fixtures (as below), also apis, contributions, spis |
| 4 | Holds classes for the so ("simple object") entity/aggregate, consisting of the entity definition itself (SimpleObject) and a corresponding domain services (SimpleObjects and SimpleObjectRepository).
The associated .layout.xml and .png are optional but provide metadata/resources for rendering (Maven is configured to also treat src/main/java as a resource location). |
| 5 | Uses Spring Data JPA to automatically provide the query implementation. |
| 6 | The fixture package contains classes to set up the database to an initial state (as described earlier.
One of the classes is a FixtureScript (defines how to set up the data) the other is a persona enum (defines what data to set up). |
| 7 | The types package contains meta-annotations to describe the usage of common value types such as Strings. |
| 8 | SimpleModule is a Spring @Configuration which allows the domain services and entities of the module to be located.This is discussed in more detail below. |
SimpleModule
Every module within an Apache Causeway application should have a module class.
Its purpose is to define a package to scan from, and optionally to declare any transitive dependencies.
In the case of SimpleModule, it consists of:
package domainapp.modules.simple;
... imports omitted ...
@Configuration
@Import({})                                            (1)
@ComponentScan                                         (2)
@EnableJpaRepositories                                 (3)
@EntityScan(basePackageClasses = {SimpleModule.class}) (4)
public class SimpleModule
                implements ModuleWithFixtures {        (5)

    @Override
    public FixtureScript getTeardownFixture() {
        return new TeardownFixtureAbstract2() {
            @Override
            protected void execute(ExecutionContext executionContext) {
                deleteFrom(SimpleObject.class);
            }
        };
    }

    @ConfigurationProperties("app.simple-module")      (6)
    @Data
    @Validated
    public static class Configuration {
        private final Types types = new Types();
        @Data
        public static class Types {
            private final Name name = new Name();
            @Data
            public static class Name {
                private final Validation validation = new Validation();
                @Data
                public static class Validation {
                    private char[] prohibitedCharacters = "!&%$".toCharArray();
                    private String message = "Character '{}' is not allowed";
                }
            }
        }
    }

}| 1 | This module has no dependencies.
If there were, these would be expressed in terms of module classes (each being a Spring @Configuration) |
| 2 | specifies this class' package as a root to scan for Spring @Components. |
| 3 | for jpa branch only, enables Spring Data JPA repositories |
| 4 | for jpa branch only, to automatically discover JPA entities |
| 5 | Optionally, modules can implement the testing’s ModuleWithFixtures interface.
Through this, they can provide a fixture script which can be used to teardown all entities that are "owned" by the module.
Since the module dependency graph is known, this allows all data to be removed, useful for prototyping and sometimes for integration tests. |
| 6 | Spring Boot type-safe configuration, as per @ConfigurationProperties annotation.
This Spring Boot feature is used by the framework, but can equally easily be used by application code.
The @Name.Specification class uses this configuration property. |
The scanning mechanism is also leveraged by Apache Causeway to pick up three types of classes:
-
all domain services
These are classes that are annotated with the framework’s @DomainService annotation. Because
@DomainServiceis meta-annotated as a@Component, these are found automatically and are managed by Spring (ie instantiated, injected etc).Depending on their nature, domain services are used to build up the menu, or are available to call programmatically, eg repositories, or sometimes both.
In the simpleapp starter app, the only domain service is
SimpleObjects. This appears in the menu, and also acts as a repository for theSimpleObjectentity. It also has theSimpleObjectRepositoryrepository interface for which Spring Data provides the query implementations. -
all entities.
These are entities that are annotated with both @DomainObject annotation and with the JPA
@jakarta.persistence.Entityannotation.In the simpleapp starter app, the only entity is
SimpleObject. -
all fixture scripts
These are classes that extend from the testing applib’s
FixtureScriptclass, and are used to setup the database when running in prototype mode (against an in-memory database).As already discussed, the
fixturepackage provides classes to create sample objects, while theSimpleModuleprovides a fixture script to tear down all data from the module.
module-jpa-simple-test’s src/test/java
Under src/test/java we have:
src/test/java/
  domainapp/
    modules/
      simple/
        dom/
          so/                                       (1)
            SimpleObject_Test.java
            SimpleObjects_Test.java
        integtests/
          tests/                                    (2)
            SimpleObject_IntegTest.java
            SimpleObjects_IntegTest.java
          SimpleModuleIntegTestAbstract.java        (3)
          SimpleModuleIntegTestConfiguration.java   (4)
src/test/resources/
application-test.yml (5)| 1 | These are very simple unit tests of SimpleObject and SimpleObjects with the package structure the same as in src/main/java.
They are written in JUnit 5, and use JMockito as the mocking library. |
| 2 | Integration tests for the module. These use the WrapperFactory to simulate interactions through the UI. |
| 3 | The SimpleModuleIntegTestAbstract superclass bootstraps the module’s integration tests.
This is discussed in more detail below. |
| 4 | Spring to bootstrap the integration test. |
| 5 | Configuration for the "test" profile |
| these integration tests are annotated with the Spring @Transactional, which means that Spring will automatically roll back the changes to the database; there’s no need to delete data afterwards. |
the naming convention — with Test and IntegTest suffixes — is important, because the Maven surefire plugin is configured to run multiple times, one <execution> for each suffix.
|
SimpleModuleIntegTestAbstract
The SimpleModuleIntegTestAbstract is the superclass of all integration tests in the module, annotated with @SpringBootTest:
@SpringBootTest(
        classes = SimpleModuleIntegTestAbstract.TestApp.class             (1)
)
@ActiveProfiles("test") (2)
public abstract class SimpleModuleIntegTestAbstract
        extends CausewayIntegrationTestAbstractWithFixtures {             (3)

    @Configuration
    @Import({
        CausewayModuleCoreRuntimeServices.class,                          (4)
        CausewayModuleSecurityBypass.class,                               (5)
        CausewayModuleJpaEclipseLink.class,                               (6)
        CausewayModuleTestingFixturesApplib.class,                        (7)

        SimpleModule.class                                                (8)
    })
    @PropertySources({
        @PropertySource(CausewayPresets.H2InMemory_withUniqueSchema),     (9)
    })
    public static class TestApp {
    }
}| 1 | The TestApp (defined as a nested static class below) lists the modules needed to bootstrap the integration test. |
| 2 | Activates the "test" profile, which reads in additional configuration in `application-test.yml" |
| 3 | Tests typically inherit from CausewayIntegrationTestAbstract, which provides some convenience methods to inherit from.
In this case, the test inherits from the CausewayIntegrationTestAbstractWithFixtures subclass which also adds in support for running fixtures. |
| 4 | Specifies the modules that make up Apache Causeway framework itself. Note that no viewers are bootstrapped because the tests are run through Spring’s integration testing framework, rather than (say) as Selenium tests. |
| 5 | Configures the Bypass implementation which effectively disables security checks. |
| 6 | Configures JPA/Eclipselink object store as the persistence mechanism. |
| 7 | Brings in support for running fixtures.
You can learn more about testing in the Testing Guide. |
| 8 | The module containing the actual business logic to be tested. |
| 9 | Runs the tests in memory using H2. A unique schema allows tests to potentially be run in parallel |
webapp’s src/main/java
Under src/main/java we have:
src/main/java/
  domainapp/
    webapp/
      application/
        fixture/
          scenarios/                                            (1)
            DomainAppDemo.java                                  (2)
        services/
          health/
            HealthCheckServiceImpl.java                         (3)
          homepage/
            HomePageViewModel.java                              (4)
            HomePageViewModel.layout.xml
            HomePageViewModel.png
         ApplicationModule.java                                 (5)
      custom/
        restapi/
          CustomController.class                                (6)
        CustomModule.class
      quartz/
        job/
          SampleJob.class                                       (7)
        QuartzModule.class
      AppManifest.java                                          (8)
SimpleApp.java (9)| 1 | Defines scenarios (fixtures) for setting up the system into a known state. Used for prototyping and also integration testing. |
| 2 | The DomainAppDemo is the fixture that was run earlier on. |
| 3 | An implementation of the HealthCheckService. This integrates with Spring Boot’s HealthIndicator SPI, surfaced through the Spring Boot Actuator. |
| 4 | Annotated with @HomePage and so is shown automatically as the home page. |
| 5 | Defines the services in the webapp module, along with dependencies onto the other modules in the application.
Discussed in more detail below. |
| 6 | Demonstrates how to implement a custom REST controller, accessing the domain object model managed by Apache Causeway. |
| 7 | Demonstrates how to run quartz as a background service, accessing the domain object model managed by Apache Causeway. |
| 8 | AppManifest is the top-level Spring @Configuration that specifies the components of Apache Causeway to use, along with the modules making up the application itself (ie ApplicationModule, which depends in turn on SimpleModule, and CustomModule).
This is discussed in more detail below |
| 9 | SimpleApp is the @SpringBootApplication used to bootstrap the app.
It’s pretty much boilerplate - the important piece is that it references AppManifest.
Discussed in more detail below |
ApplicationModule
The ApplicationModule defines the services in the webapp module, along with dependencies onto the other modules in the application.
It’s very simple though:
package domainapp.webapp.application;
//...

@Configuration
@Import(SimpleModule.class)             (1)
@ComponentScan                          (2)
public class ApplicationModule {
}| 1 | This module depends on the SimpleModule module. |
| 2 | specifies this class' package as a root to scan for Spring @Components. |
AppManifest
The "app manifest" is the top-level Spring @Configuration.
It looks like this:
@Configuration
@Import({
        CausewayModuleCoreRuntimeServices.class,            (1)
        CausewayModuleSecuritySimple.class,                 (2)
        CausewayModuleJpaEclipseLink.class,                 (3)
        CausewayModuleViewerRestfulObjectsViewer.class,     (4)
        CausewayModuleViewerGraphqlViewer.class,            (5)
        CausewayModuleViewerWicketViewer.class,             (6)

        CausewayModuleTestingH2ConsoleUi.class,             (7)
        CausewayModuleTestingFixturesApplib.class,          (8)

        CausewayModuleExtFlywayImpl.class,                  (9)

        ApplicationModule.class,                            (10)
        CustomModule.class,                                 (9)
        QuartzModule.class,                                 (9)

        DomainAppDemo.class                                 (11)
})
@PropertySources({
        @PropertySource(CausewayPresets.DebugDiscovery),    (12)
})
public class AppManifest {
}| 1 | Mandatory - specifies the core of the Apache Causeway framework |
| 2 | Enables the Simple security mechanism. There are several security implementations, precisely one must be selected |
| 3 | Enables JPA/Eclipselink for persistence |
| 4 | Enables the REST API (Restful Objects viewer) (ie REST API). |
| 5 | Enables the GraphQL API (GraphQL viewer). |
| 6 | Enables the Web UI (Wicket viewer) |
| 7 | Enables the H2 Console (menu from the "Prototyping" menu), applicable only if running against h2 in-memory database. |
| 8 | Brings in support to run fixtures within the application, eg for prototyping. |
| 9 | Enables the Flyway integration. |
| 10 | References the application’s module(s), in this case ApplicationModule , CustomModule and QuartzModule.
|
| 11 | Makes the fixture scenario classes available for discovery. |
| 12 | Normally configuration properties are picked up from Spring Boot’s application.properties or application.yml files, but additional properties can be overridden directly, for example using the CausewayPresets convenience class. |
SimpleApp
The application is bootstrapped using SimpleApp, a regular @SpringBootApplication.
It is mostly boilerplate:
@SpringBootApplication
@Import({
    AppManifest.class,                                          (1)
})
public class SimpleApp
            extends SpringBootServletInitializer {

    public static void main(String[] args) {
        CausewayPresets.prototyping();                              (2)
        SpringApplication.run(
                new Class[] { SimpleApp.class }, args);
    }
}| 1 | references the AppManifest mentioned earlier |
||
| 2 | specifies prototyping mode.
This enables actions marked for prototyping to become available, useful during the early stages of development.
|
webapp’s src/main/resources
Under src/main/resources we have:
src/main/resources
  config/
    application.properties              (1)
    application-SQLSERVER.properties    (2)
    application-POSTGRES.properties     (3)
  db/
    migration/
      SQLSERVER/
        Vyyyy.mm.dd.hh.ss__xxx.sql      (4)
  static/                               (5)
  templates/                            (6)
  application.yml                       (7)
  banner.txt                            (8)
  log4j2-spring.xml                     (9)
menubars.layout.xml (10)| 1 | By convention, we use config/application.properties to hold configuration properties that change between environments (dev, test, prod).
Typically this just holds JDBC connection strings, etc. |
| 2 | Enabled if run using the SQLSERVER profile (eg using -Dspring.profiles.active=SQLSERVER). Configures to use a SQL Server database, and enables Flyway to set up the database schema |
| 3 | Flyway migration scripts. This leverages a feature in Spring Boot’s Flyway integration which allows different variants of scripts for different vendors to be stored, in a db.migration.{vendor} package. |
| 4 | The static package (a Spring convention) provides access for static resources that are accessible from the webapp |
| 5 | The templates package holds a fallback error page, which is the default location for pages rendered using Spring Boot’s integration with Thymeleaf. |
| 6 | By convention, we use application.yml to hold configuration properties that do not change between environments. |
| 7 | The banner.txt is shown when bootstrapping. |
| 8 | The log4j2-spring.xml configures log4j2 |
| 9 | The menubars.layout.xml arranges the actions of the domain services into menus. |
To call out some of the files under static:
-
The
index.htmlis the page shown at the root of the package, providing links to either the Wicket viewer or to the Swagger UI. In a production application this is usually replaced with a page that does an HTTP 302 redirect to the Wicket viewer. -
In
css/application.cssyou can use to customise CSS, typically to highlight certain fields or states. The pages generated by the Wicket viewer have plenty of CSS classes to target. You can also implement thecssClass()method in each domain object to provide additional CSS classes to target. -
Similarly, in
scripts/application.jsyou have the option to add arbitrary JavaScript. JQuery is available by default.
No src/main/webapp
Note that there is no src/main/webapp/ or WEB-INF/web.xml - the servlets and filters are configured by Apache Causeway automatically.
webapp-test’s src/test/java
Under src/test/java we have a number of integration tests,
The integration tests are in domainapp.application.integtests:
src/
  test/
    java/
      domainapp/
        webapp/
          integtests/
            metamodel/
              SwaggerExport_IntegTest.java          (1)
              ValidateDomainModel_IntegTest.java    (2)
            smoke/
              Smoke_IntegTest.java                  (3)
ApplicationIntegTestAbstract.java (4)| 1 | Exports the Swagger definition file.
This could then be used to automate generation of client stubs in various languages. |
| 2 | Bootstraps the app and runs the metamodel validators to check that there are not metamodel errors.
This can also be done simply when running the application, but performing the checks through integration tests enables "fail-fast" checking, as part of CI, for example. |
| 3 | Performs a number of high-level smoke tests, to check that the core functionality works correctly. |
| 4 | Base class used to bootstrap all integration tests for this module.
It is very similar to the base class used to bootstrap the integration tests for the simple module SimpleModuleIntegTestAbstract, but referencing ApplicationModule rather than SimpleModule. |
|
The naming convention of tests classes is important, because the starter parent pom configures the Maven surefire plugin to execute multiple times, based on test class suffix. The suffixes are: |
Root module’s pom.xml
In the parent module we of course have the pom.xml.
This inherits from causeway-app-starter-parent:
<parent>
    <groupId>org.apache.causeway.app</groupId>
    <artifactId>causeway-app-starter-parent</artifactId>
    <version>XXX</version>
</parent>
... which builds upon Spring Boot’s own org.springframework.boot:spring-boot-starter-parent.
This means:
-
the set of third party dependencies declared have been validated as compatible by Spring Boot team
-
build plugins are declared and configured appropriately
-
imports to the Apache Causeway dependencies are declared via
<dependencyManagement>
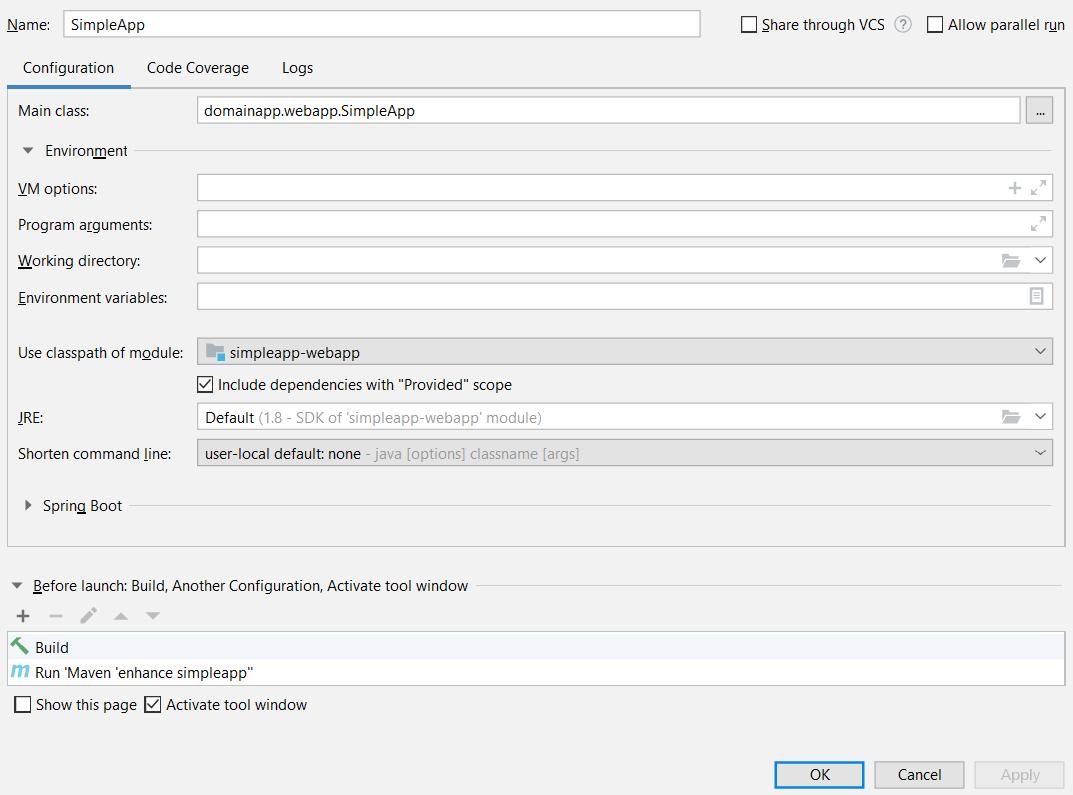
Running from within the IDE
Most of the time you’ll probably want to run the app from within your IDE.
The mechanics of doing this will vary by IDE; see the Setup Guide for details.
Basically, though, it amounts to running the main() method in the SimpleApp class.
Here’s what the setup looks like in IntelliJ IDEA:
Experimenting with the App
Once you are familiar with the app, try modifying it. There is plenty more guidance on this site; start with the User Guide Fundamentals and then look at the other guides linked to from the top-level menu or from the main table of contents.
If you run into issues, please don’t hesitate to ask for help on the users mailing list or the Slack channel, as per the support page.
Using an external database and FlywayDB
The application is configured by default uses H2 as an inmemory database, with fixtures used to populate the database with representative data.
To deploy to production though of course will require a persistent database, and the schema of the tables will be explicitly managed. Although JPA/Eclipselink can automatically create the database schema, many development teams choose to manage the schema externally to the ORM.
A popular tool to do this is Flyway, and Spring Boot provides automatic support for it using these configuration properties.
The simpleapp demonstrates how this can be done using SQL Server. Adapt the following for your own preferred database.
Prereqs
If you happen to use SQL Server, then just use a dev instance. Otherwise, you can easily run up an instance using Docker:
docker run \
    --platform linux/amd64 \
    --name sqlserver-simpleapp \
    -e 'ACCEPT_EULA=Y' \
    -e 'SA_PASSWORD=VeryStrongPassword123!' \
    -p 1433:1433 \
    -d mcr.microsoft.com/mssql/server:2022-latest
You can then connect:
-
if on Linux/Mac, start a command line client using:
docker exec -it sqlserver-simpleapp \ /opt/mssql-tools18/bin/sqlcmd \ -S localhost -U sa -P VeryStrongPassword123! -C -
if on Windows, you might instead prefer to use Microsoft’s free GUI client, SQL Server Management Studio.
You then need to create a database and login:
CREATE DATABASE [simpleapp]
go
CREATE LOGIN [simpleapp]
    WITH PASSWORD=N'simpleapp',
        DEFAULT_DATABASE=[simpleapp],
        CHECK_EXPIRATION=OFF, CHECK_POLICY=OFF
go
USE [simpleapp]
GO
ALTER AUTHORIZATION ON DATABASE::[simpleapp] TO [simpleapp]
GO
If using the command line, type 'exit' to quit out.
To confirm the connect, try logging in as simpleapp/simpleapp, and verify using:
select db_name(), user_name()
go
This should return simpleapp and dbo respectively, meaning that the simpleapp login is all-powerful in the simpleapp database.
Enabling Flyway
With the backend database running, we can now run the simpleapp application with Flyway enabled. This is done simply by activating the "SQLSERVER" profile (see also the Spring docs):
-
either by setting a system property:
-Dspring.profiles.active=SQLSERVER -
or by setting an environment variable:
export SPRING_PROFILES_ACTIVE=SQLSERVER
This will cause Spring to read in the config/application-SQLSERVER.properties file:
spring.flyway.enabled=true
spring.flyway.default-schema=SIMPLE
spring.flyway.schemas=SIMPLE

spring.sql.init.platform=sqlserver
spring.datasource.url=jdbc:sqlserver://localhost;databaseName=simpleapp
spring.datasource.driver-class-name=com.microsoft.sqlserver.jdbc.SQLServerDriver
spring.datasource.username=simpleapp
spring.datasource.password=simpleapp

#causeway.persistence.schema.create-schema-sql-template=   (use flyway instead)
causeway.persistence.schema.auto-create-schemas=
Flyway in turn reads the migration scripts under db.migration package (in src/main/resources of the webapp module).
Run up the application and Flyway will run in the scripts.
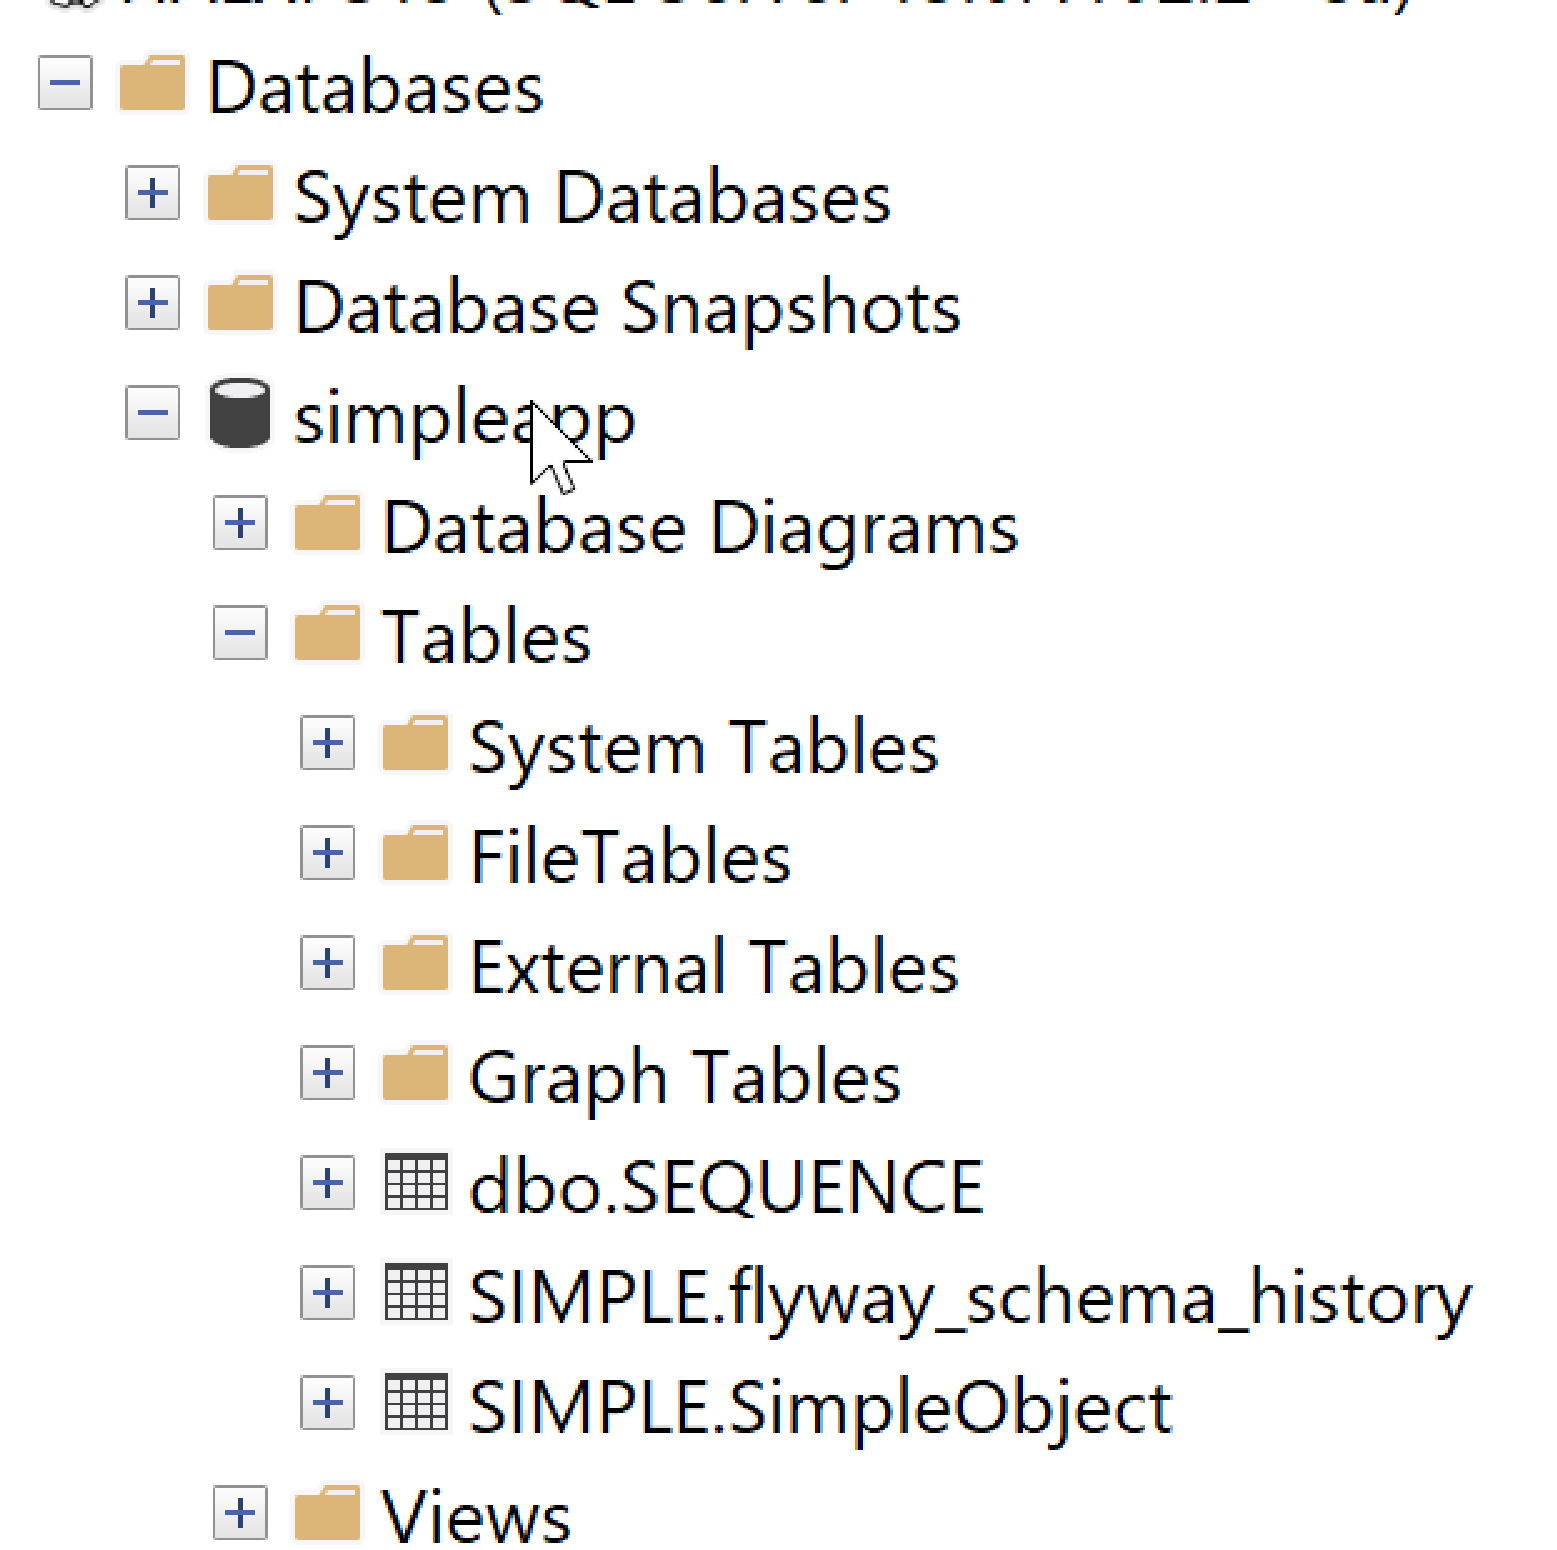
It will also create its own table, SIMPLE.flyway_schema_history: